


Special offers from our partners!

Find Replacement BBQ Parts for 20,308 Models. Repair your BBQ today.

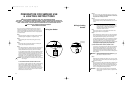
Step 1
Make sure the control panel knob for the LP log-lighter and the fryer are
both in the “OFF” position.
Step 2
Fill metal cookware with desired amount of water or oil. Never fill pan more
than half way to allow room for addition of food and to avoid boil-over of
hot liquids. Never place an empty pan over an open flame. Do not place pan
on cooker at this time.
Step 3
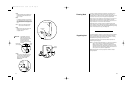
Open the propane tank valve two full turns. Using a long match, hold the
flame 2" above burner porthole. Turn the control knob SLOWLY until the
burner lights.
WARNING: If the burner does not light within 5 seconds, turn the
propane tank valve and control knob OFF immediately.
Wait at least 5 minutes until gas fumes have dissipated
before attempting to light the burner again.
Step 4
After lighting the burner, open the control knob until a large yellow flame
appears. Adjust the air shutter valve on the cooker until the flame turns
blue. Use the control knob to adjust the flame accordingly.
Step 5
Place pan with liquid on cooker. The retaining ring allows placement of a
14.5" (36.8 cm) diameter pan. Any pan larger than the retaining ring will
rest on the retaining ring of cooker. This cooker is designed to hold no more
than a Brinkmann 2 gallon Pan & Basket.
WARNING: Before proceeding read all safety warnings and instructions
carefully before operating your cooker.
Step 6
Bring liquid to the desired cooking temperature. For best results, use a deep
fry thermometer to check oil temperature. If oil begins to smoke, reduce the
flame to avoid igniting the oil. Never exceed 375°F (190° C).
Step 7
Use pan/pot with a cooking basket or strainer with handle to lower food into
hot liquid. Lower food into the pan slowly. Frozen foods should be thawed
to room temperature before placing in hot liquid. The temperature of liquid
will drop when food is added. Adjust the flame to return to desired cooking
temperature. When the desired temperature is achieved, reduce the heat to
maintain temperature.
Step 8
Test food for doneness using a meat thermometer after removing from hot
liquid. Use caution as food will be very hot.
FRYER OPERATING INSTRUCTIONS
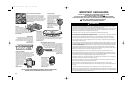
PLACE THE SMOKER OUTDOORS ON A HARD, LEVEL, NON-COMBUSTIBLE SURFACE
AWAY FROM ROOF OVERHANG OR ANY COMBUSTIBLE MATERIAL. NEVER USE ON WOODEN OR OTHER
SURFACES THAT COULD BURN. PLACE THE SMOKER AWAY FROM OPEN WINDOWS OR DOORS TO PREVENT
SMOKE FROM ENTERING YOUR HOUSE. IN WINDY WEATHER, PLACE THE SMOKER IN AN OUTDOOR AREA THAT
IS PROTECTED FROM THE WIND.
READ ALL SAFETY WARNINGS AND INSTRUCTIONS CAREFULLY BEFORE OPERATING YOUR SMOKER.
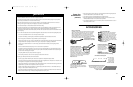
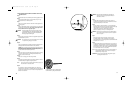
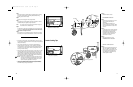
Fryer and LP Log-lighter
Control Panel
NOTE: Due to the intense heat from burner,
it is normal for paint burn off and
discoloration to occur on cooker
during the first few uses.
L Fryer R Fryer
OFF
LOW
HI
OFF
LOW
HI
17
Rotating Air
Shutter
Air Hole
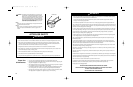
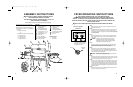
PARTS LIST
1 Cooking chamber with
attached firebox
1 Air vent butterfly damper
1 Smokestack with damper
1 Cooking grill (15
1
⁄
4
" x 12
7
⁄
16
")
1 Cooking grill (15
1
⁄
4
" x 15")
1 Charcoal grate (9" x 14')
1 Front shelf
2 Legs with endcaps
2 Legs with axle receivers
2 16" wagon wheels
1 Firebox door latch
1 Firebox rake
1 Temperature gauge
1 Assembled fryer attachment
with hoses and LP log-lighter
2 Propane bottle hooks
1 Axle rod
Parts Bag Contains:
4 w" Washers
2 d" Axle caps
4
ASSEMBLY INSTRUCTIONS
READ ALL SAFETY WARNINGS & ASSEMBLY INSTRUCTIONS CAREFULLY
BEFORE ASSEMBLING OR OPERATING YOUR SMOKER.
FOR MISSING PARTS, PLEASE CALL CUSTOMER SERVICE AT 1-800-527-0717.
(PROOF OF PURCHASE WILL BE REQUIRED.)
Inspect contents of the box to ensure all parts are included and undamaged.
1
2
3
5
6
7
8
9
10
12
13
16
11
1
2
5
6
7
4
3
4
8
9
10
12
11
13
14
15
16
15
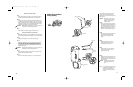
We recommend two people work together when
assembling this unit.
The following tools are required to assemble this
Cimarron Deluxe and connect your fryer attachment:
• Hammer
• Two adjustable wrenches:
or
Adjustable wrench and the following wrenches:
• d" Open end wrench
• w" Open end wrench
• f" Open end wrench
•
9
⁄
16
" Open end wrench
14
INSTR-Cimarron Deluxe 5/6/02 9:31 AM Page 11