


Special offers from our partners!

Find Replacement BBQ Parts for 20,308 Models. Repair your BBQ today.

10
6. Repeat steps 3–5 for lighting each burner. Always use electronic igniter for lighting each burner. If burner
does not ignite using the push-button igniter, wait 5 minutes, see “Match Lighting the Main Burners”
section.
7. To turn off, turn each control knob clockwise until it locks in the “OFF” position. This does not turn off the
gas ow from the cylinder..
Note: If burner does not light or ame is too low, See “Trouble Shooting” section of the owners manual.
MATCH LIGHTING THE MAIN BURNERS:
1. Open lid before lighting.
2. Make sure all control knobs are in the “OFF” position.
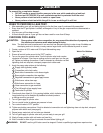
3. Place a paper match in the end of the matchlighter. Strike the match and
place through lighting hole in the left hand side of the grill to approximately
1/2” (1 to 2 cm) from the burner.
4. Turn on the FAR LEFT burner control knob to the “HIGH” position. The
burner should light within 5 seconds.
5. If the burner does not light, turn the control knob to “OFF” and wait
5 minutes for gas to dissipate and repeat lighting procedure.
6. Once lit, light adjacent burners in sequence by pressing in and rotating the
control knob to the “HIGH” position.
7. If the burner does not light within the rst few attempts of match lighting, there is a problem with the gas
supply. Turn off the gas at the burner and cylinder. DO NOT attempt to operate the grill until the problem
is found and corrected.
Note: If burner does not light or ame is too low, See “Trouble Shooting”
section of the owners manual.
Note: Observe ame height when lit: Flame should be a Blue/Yellow
color between 1”–2” when burner is on “HIGH”.
See section in manual on burner adjustment to adjust ame.
LIGHTING THE SEAR BURNER:
1. Open lid before lighting sear burner.
2. Make sure control knob is in the “OFF” position.
3. Push and turn the control knob to the “HIGH” position. Continue to push
in control knob while pressing electronic igniter for 3–5 seconds.
4. Once burner is lit, continue to push and hold control knob for
30 seconds.
5. If ignition does NOT occur in 5 seconds, turn control knob to “OFF”,
wait 5 minutes to allow gas to dissipate and repeat lighting procedure.
6. To turn off, turn control knob clockwise until it locks in “OFF” position.
Note: If burner does not light or ame is too low, See “Trouble
Shooting” section of the owners manual.
MATCH LIGHTING THE SEAR BURNER:
1. Open the lid to the sear burner before lighting.
2. Turn the burner control knob to “OFF”.
3. Strike and carefully place a match approximately 1/2” (1 to 2 cm) from the burner.
4. Push and turn the sear burner control knob to the “HIGH” position. Continue to push in control knob
while holding a match to burner. The burner should light within 5 seconds.
5. Once burner is lit, continue to push and hold control knob for 30 seconds.
6. If the burner does not light, turn the control knob to “OFF” and wait 5 minutes for gas to dissipate and
repeat lighting procedure.
7. If the burner does not light within the rst few attempts of match lighting, there is a problem with the gas
supply. Turn off the gas at the burner and cylinder. DO NOT attempt to operate the sear burner until the
problem is found and corrected.
Note: If burner does not light or ame is too low, See “Trouble Shooting” section of the owners manual.
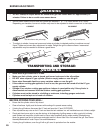
Lighting Hole
Matchlighter
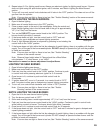
Sear Burner Lighting Instructions:
1. Open lid during lighting.
2. Push and turn control knob to “HIGH” and continue to push in.
3. Press electronic igniter and hold for 3 to 5 seconds.
4. Continue to push in control knob for 30 seconds after sear burner is lit.
5. If ignition does not occur in 5 seconds, turn control knob to “OFF,” wait 5
minutes and repeat lighting procedure.
Instrucciones de Iluminación para la Hornilla
para Dorar:
1. Abra la tapa durante el encendimiento.
2. Empuje la perilla de control y gire a la posición “ALTO” y continúe
empujando hacia adentro.
3. Presione el encendedor electrónico y sosténgase por 3 a 5 segundos.
4. Continúe empujando la perilla de control hacia adentro por
30 segundos después de que la hornilla para dorar se enciende.
5. Si la hornilla NO se enciende en 5 segundos, gire la perilla de control a la
posición "APAGADO", espere 5 minutos y repita el procedimiento de
encendido.
SEAR BURNER
HORNILLA PARA
DORAR
MAXIMUM SEAR
BURNER WEIGHT = 15 lbs.
PESO MÁXIMO DE LA HORNILLA
PARA DORAR = 6.8 kg