


Special offers from our partners!

Find Replacement BBQ Parts for 20,308 Models. Repair your BBQ today.

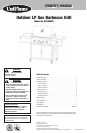
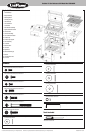
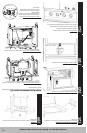
Outdoor LP Gas Barbecue Grill Model No. NSG3902D
Contact 1-800-762-1142 for assistance. Do not return to place of purchase.
page no.
3
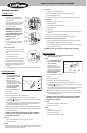
Assembly Instructions
DO NOT RETURN PRODUCT TO STORE.
For assistance call 1.800.762.1142 toll free. Please have your owner’s manual and serial
number available for reference.
For Easiest Assembly:
• To avoid losing any small components or hardware, assemble your product on a hard level
surface that does not have cracks or openings.
• Clear an area large enough to layout all components and hardware.
• When applicable, tighten all hardware connections by hand first. Once the step is
completed, go back and fully tighten all hardware.
• Follow all steps in order to properly assemble your product.
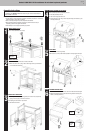
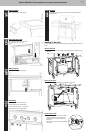
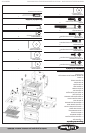
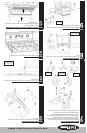
Step
1
Attach wheels to cart
Insert 4 wheel assemblies into cart legs.
Step
2
Attach cross bar
A. Insert tabs on cross bar into slots on inside of cart frame.
B. Attach cross bar to cart by using 2 sets of extra large screws (F), lock washers
(L), and extra large washers (K).
Note: cart is shown
upside down.
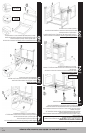
Step
3
Attach doors and basket
A. Install right and left doors by placing bottom pin into hole in cart, depress top
spring pin and snap top pin into hole in cross bar.
Note: Spring pins are located on top of doors.
B. Hang basket on left door.
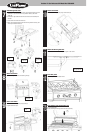
Step
5
Insert bolts
Insert 4 bolts (G) into side of grill body.
Note: Leave 0.3” (8 mm) of bolt threads exposed. Do not fully tighen until step 9.
Step
6
Assemble left side shelf
A. Insert tabs on left condiment holder into slots on left side shelf and slide right.
B. Attach left condiment baskets to left side shelf using medium screw (D), lock
washer (L) and large washer (J).
Step
4
Secure grill body to cart frame
Note: 2 people required to put grill body onto cart.
A. Place body assembly onto cart.
B. Feed hose through right side of cart.
C. Secure grill body to cart using 4 sets of large screws (E), lock washers (L), and
extra large washers (K).
Note: shown
from rear.
Note: shown
from below
and rear.