


Special offers from our partners!

Find Replacement BBQ Parts for 20,308 Models. Repair your BBQ today.

9
Owner’s manual: model NBC3121D outdoor charcoal grill / Manual de usuario: parrilla de carbón vegetal para exteriores, modelo NBC3121D 10/8/03
Contact 1-800-762-1142 for assistance.
Do not return to place of purchase.
Si necesita ayuda llame al 1-800-762-1142
No devuelva el artículo al lugar de compra.
10
Owner’s manual: model NBC3121D outdoor charcoal grill / Manual de usuario: parrilla de carbón vegetal para exteriores, modelo NBC3121D 10/8/03
Contact 1-800-762-1142 for assistance.
Do not return to place of purchase.
Si necesita ayuda llame al 1-800-762-1142
No devuelva el artículo al lugar de compra.
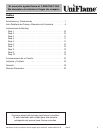
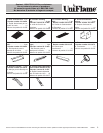
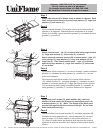
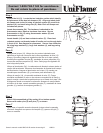
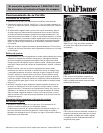
Step 1
To begin, assemble the cart of your new grill. First, compare cart
frame - left (1) and cart frame - right (2) to identify them. Cart frame
- right (2) will have holes at the bottom of each leg to which the
wheels will be secured. Locate threaded wheel axle (4) and run
through holes in cart frame - right (2). Place rubber wheel spacer
(N), wheel (5), and wheel washer (O) on wheel axle. Secure using
wheel nuts (F).
Note: If necessary, pop wheel decals off wheels in order to secure
wheels to wheel axle, then snap wheel decal back in place.
Attach right side of condiment holder (23) to cart frame - right (2) as
shown using large washers (L), large lock washers (J), and screws
(C).
Secure link beams (3) to cart frame - right (2) using frame screws
(A). Then, attach cart frame - left (1) to opposite ends of link beams
using frame screws (A). Attach opposite end of condiment holder
to cart frame - left (1) using large washers (L), large lock washers
(J), and screws (C).
Place wire bottom rack (7) on assembled frame.
Place ash pan track - left (21) and ash pan track- right (22) atop
assembled cart as shown.
Note: The ash pan tracks will be secured to the cart when the
bottom body is attached to the cart. See Step 2.
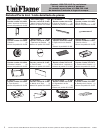
Assembly Instructions
For Best Results
Remove all contents from packaging, and make sure all parts are present before attempting to
assemble! Tighten all screw connections by hand first, then when the grill is fully assembled,
go back and tighten.
Instrucciones de Montaje
Para Obtener los Mejores Resultados
¡Saque todos los componentes del embalaje y asegúrese de que todas las piezas están presentes
antes de iniciar el montaje! Apriete primero todas las conexiones de tornillos a mano, a continuación,
cuando la parrilla esté completamente montada, acabe de apretar las conexiones.
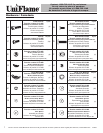
2
7
1
A
N
4
6
F
5
O
3
21
22
23
L
J
C