


Special offers from our partners!

Find Replacement BBQ Parts for 20,308 Models. Repair your BBQ today.

Contact 1.800.762.1142 for assistance. Do not return to place of purchase.
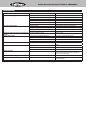
page no.
11
7. Remove all food residue and dirt on burner surface.
8. Clean any clogged ports with a stiff wire (such as an opened paper clip)
9. Inspect burner for any damage (cracks or holes). If damage is found, replace with new
burner.
10. Reinstall burner, check to insure that gas valve orifice is correctly positioned inside burner
inlet (venturi). Also check position of spark electrode.
11. Replace cooking grid.
12. Preform leak test.
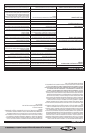
Product Registration
For faster warranty service, please register your product immediately at www.bluerhino.com or
call 1.800.762.1142.
Limited Warranty
Blue Rhino Global Sourcing, Inc (“Vendor”) warrants to the original retail purchaser of this
product, and to no other person, that if this product is assembled and operated in accordance
with the printed instructions accompanying it, then for a period of two (2) years for the
burners; and one (1) year for all remaining parts from the date of purchase, all parts in
such product shall be free from defects in material and workmanship. Vendor may require
reasonable proof of your date of purchase. Therefore, you should retain your sales slip or
invoice. This Limited Warranty shall be limited to the repair or replacement of parts, which
prove defective under normal use and service and which Vendor shall determine in its
reasonable discretion upon examination to be defective. Before returning any parts, you should
contact Vendor’s Customer Service Department using the contact information listed below. If
Vendor confirms, after examination, a defect covered by this Limited Warranty in any returned
part, and if Vendor approves the claim, Vendor will replace such defective part without charge.
If you return defective parts, transportation charges must be prepaid by you. Vendor will return
replacement parts to the original retail purchaser, freight or postage prepaid.
This Limited Warranty does not cover any failures or operating difficulties due to accident,
abuse, misuse, alteration, misapplication, improper installation or improper maintenance or
service by you or any third party, or failure to perform normal and routine maintenance on
the product as set out in this owner’s manual. In addition, the Limited Warranty does not cover
damage to the finish, such as scratches, dents, discoloration, rust or other weather damage,
after purchase.
This Limited Warranty is in lieu of all other express warranties. Vendor disclaims all
warranties for products that are purchased from sellers other than authorized retailers
or distributors, including the warranty of merchantability or the warranty of fitness for a
particular purpose. VENDOR ALSO DISCLAIMS AND ANY ALL IMPLIED WARRANTIES, INCLUDING
WITHOUT LIMITATION THE IMPLIED WARRANTIES OF MERCHANTABILITY AND FITNESS FOR A
PARTICULAR PURPOSE. VENDOR SHALL NO LIABILITY TO PURCHASER OR ANY THIRD PARTY
FOR ANY SPECIAL, INDIRECT, PUNITIVE, INCIDENTAL, OR CONSEQUENTIAL DAMAGES. Vendor
further disclaims any implied or express warranty of, and assumes no responsibility for,
defects in workmanship caused by third parties.
This Limited Warranty gives the purchaser specific legal rights; a purchaser may have other
rights depending upon where he or she lives. Some jurisdictions do not allow the exclusion
or limitation of special, incidental or consequential damages, or limitations on how long a
warranty lasts, so the above exclusion and limitations may not apply to everyone.
Vendor does not authorize any person or company to assume for it any other obligation or
liability in connection with the sale, installation, use, removal, return, or replacement of its
equipment, and no such representations are binding on Vendor.
Blue Rhino Global Sourcing, Inc
Winston-Salem, North Carolina 27104 USA
(800) 762-1142
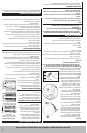
Cooking
1. Light burner.
2. Set burner to desired temperature
3. Place pan on center of grid.
4. Cook and adjust temperature as needed.
Cleaning and Care
CAUTION: All cleaning and maintenance should be done when grill is
cool and with the fuel supply disconnected.
CAUTION: DO NOT clean any grill part in a self cleaning oven. The
extreme heat will damage the finish.
Notices
1. This grill should be thoroughly cleaned and
inspected on a regular basis.
2. Abrasive cleaners will damage this product.
3. Never use oven cleaner to clean any part of grill.
4. Do not clean any grill part in a self cleaning oven.
The extreme heat will damage the finish.
Before Each Use:
1. Keep the grill area clean and free from any
combustible materials, gasoline, and other flammable
vapors and liquids.
2. Do not obstruct the flow of the combustion of gas and
the ventilation air.
3. Visually check the burner flames, to make sure your
grill is working properly.
4. See cleaning instructions below for proper cleaning
instructions.
5. Check and clean the burner/venturi tubes for insects
and insect nests. A clogged tube can lead to a fire
beneath the grill.
Cleaning Surfaces
1. Wipe surfaces clean with mild dishwashing detergent
or baking soda.
2. For stubborn surfaces use a citrus based degreaser and a nylon scrubbing brush.
3. Rinse clean with water.
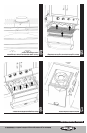
Cleaning Main Burner
1. Turn natural gas main valve “OFF”.
2. Turn all control knobs clockwise to the “OFF” position.
3. Remove cooking grid and heat plates.
4. Remove burner by removing the fasteners securing the burner to the grill bottom.
5. Lift burner up and away from gas valve orifice.
6. Disconnect wire from spark electrode.
7. Clean inlet (venturi) of burner with small bottle brush or compressed air.
8. Remove all food residue and dirt on burner surface.
9. Clean any clogged ports with a stiff wire (such as an opened paper clip)
10. Inspect burner for any damage (cracks or holes). If damage is found, replace with new
burner.
11. Reinstall burner, check to insure that gas valve orifice is correctly positioned inside burner
inlet (venturi). Also check position of spark electrode.
12. Replace heat plate and cooking grid.
13. Preform leak test.
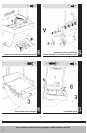
Cleaning Side Burner
1. Turn natural gas main valve “OFF”.
2. Turn all control knobs clockwise to the “OFF” position.
3. Remove side burner grid.
4. Remove burner by removing the screws securing the burner to the side shelf.
5. Lift burner up and away from gas valve orifice.
6. Clean inlet (venturi) of burner with small bottle brush or compressed air.
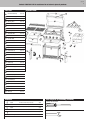
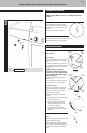
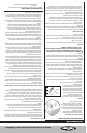
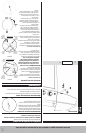
1-2 in. /
25.4 - 50.8 mm
1-2 in. /
25.4 - 50.8 mm
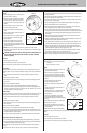
Normal: Soft blue flames with
yellow tips between 1 in. - 2 in.
hight.
Needs Cleaning: Noisy with hard
blue flames.
Has to be cleaned: Wavy with
yellow flames.
Burner Flame Conditions
Use this chart check to see if your
burners need to be cleaned.
Operating Instructions (continued) Cleaning and Care (continued)