


Special offers from our partners!

Find Replacement BBQ Parts for 20,308 Models. Repair your BBQ today.

5
ENGLISH
Mains plug replacement
If a new mains plug needs to be fitted:
• Safely dispose of the old plug
• Connect the brown lead to the live terminal of
the new plug
• Connect the blue lead to the neutral terminal
• If the product is class I (earthed), connect the
green/yellow lead to the earth terminal.
Note: If your product is class II double insulated
(only 2 wires in the cord set), no connection is to
be made to the earth terminal.
Follow the fitting instructions supplied with good
quality plugs
Any replacement fuse must be of the same
rating as the original fuse supplied with the
product.
Warning! The above section on mains plug
replacement is for authorized service centre
personals.
Before first use
• Remove all packaging from the appliance.
• Clean the appliance before first use.
• Fill the kettle with cold water to the maximum
fill mark. Do not over fill. Fill as described
below.
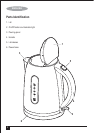
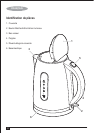
• Close the lid (1). Boil the water as described
below.
• Discard the boiled water and repeat the
procedure.
Use
Warning! Always place the appliance on a flat,
clean and non-slip surface before operating it.
Warning! Always allow the product and
contents to cool before opening the lid /
re-filling.
Warning! Always check the water level while
using the appliance. Never use the appliance
without sufficient water.
Warning! Steam may escape from the spout.
Warning! This Kettle must only be used with the
Kettle base provided.
• Place the kettle base (6) on a suitable
surface.
• Take the kettle to a water outlet. Open the lid
(1) by pressing the lid release (5).
• Fill the kettle with cold water to the desired
level.
• To prevent dry-boiling fill to at least 250 ml
(one cup).
• Do not fill the kettle beyond the maximum fill
mark. If the kettle is overfilled, boiling water
may be ejected from the pouring spout (3).
• Close the lid (1) and make sure it snaps into
place.
• Place the kettle on the power base (6).
• Insert the plug into a suitable electrical outlet
and push the on/off switch (2) to the on
position (I).
• The power on indicator (2) will light.