


Special offers from our partners!

Find Replacement BBQ Parts for 20,308 Models. Repair your BBQ today.

7 8
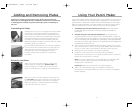
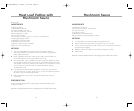
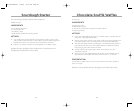
Adding and Removing Plates
Caution: To prevent a serious burn injury, always ensure that your
Panini Grill is unplugged and has completely cooled prior to removing
or adding plates. Always dry plates thoroughly prior to installing on
the unit.
Standing in front of your unit grasp the bottom plate
and line up the two rear locking pins (see figure 1)
on the back of the plate with the receptacles in the
rear of the unit. Gently lay the plate down and apply
downward pressure to snap the front plate locks
into place. You will hear a click indicating that the
plate has locked into place. To ensure that your plate
is locked, gently try to lift it up.
figure 1
The top plate is identified by the nub which appears
on the reverse side towards the front (see figure 2).
Align the two rear locking pins on the back of the
top plate with the two receptacles in the top
housing. Gently press the plate in until it locks
into place.
figure 2
With your unit in the open position, remove the
bottom plate by pressing the bottom plate lock
button located on the right side of the unit. (see
figure 3) while lifting the plate up and towards you.
figure 3
With your unit in the open position, press down on
the top plate lock button located in the center front
of your unit while keeping one hand on the plate
itself. (see figure 4). Guide the plate forward with
your hand and lift up to remove.
figure 4
Assembling the Plates
Removing the Plates
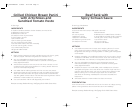
Using Your Panini Maker
Your Panini Maker is best used with thick, crusty breads, such as French,
Italian, and focaccia. The top grill plate is weighted to compress and
grill a Panini to perfection in about 3 minutes (depending on the bread,
filling, and personal taste). Your Panini Maker can also be used to grill a
variety of food items, such as meats, poultry, fish, and vegetables.
1 Completely pull out Drip Drawer prior to use. Place drip drawer
underneath grease channel so that any drippings will fall into
the drawer.
2 Preheat the grill to the desired temperature. Your grill will not
properly preheat unless the grill is in the closed position. Close the
cover and plug into a 120-volt 60 HZ AC outlet only. The red light will
turn on indicating that the appliance is preheating. After approximately
8 minutes, the green light will turn on indicating that the appliance is
preheated and ready for use.
3 Open the lid using the black handle only, being careful not to touch
any hot surfaces such as the housing or grill plates. We recommend
the use of oven mitts or potholders to prevent the risk of injury.
4 Place items to be cooked on the bottom grill plate.
5 Lower the cover and cook the food according to desired
temperature or doneness. Do not apply excessive force to close the
lid and do not lock latch on handle.
Note: The green ready light is thermostatically controlled and will
cycle on and off during cooking to ensure that the correct
temperature is maintained.
Important: Grill only with the lid in the closed position.
6 When you have finished using your appliance, disconnect
the plug from the wall and allow the unit to cool down completely
before cleaning.
HSN_PaniniManual 3/20/07 10:12 PM Page 7