Special offers from our partners!

Find Replacement BBQ Parts for 20,308 Models. Repair your BBQ today.

Buy Weber Grill Parts. It couldn't be easier. Find your Weber parts here.

18
WWW.WEBER.COM
®
OPERATING INSTRUCTIONS
SNAP IGNITION OPERATION
ƽ Always open the lid before igniting the burners
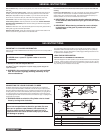
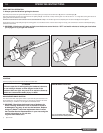
Each control knob has its own igniter electrode built in. To create a spark you must push the control knob in (A) and turn to “START/High” (B).
This action will generate gas flow and a spark to the burner lighting tube (C). You will hear a “snap” from the igniter. You will also see a 3˝ - 5˝ orange flame coming from the burner
lighting tube at the left side of the burner (D).
Continue to hold the burner control knob in for two seconds after the “snap”. This will allow gas to flow completely down the burner tube (E) and insure ignition.
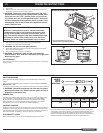
Check that the burner is lit by looking through the cooking grates. You should see a flame. If burner does not light on first try, push control knob in and turn to OFF.Repeat lighting
procedure a second time.
ƽ WARNING: If the burner still does not light, turn the burner control knob to “OFF” and wait 5 minutes to let the gas clear before
you try again or try to light with a match.
LIGHTING
Summary lighting instructions are inside the left hand cabinet door.
ƽ DANGER
Failure to open the lid while igniting the barbecue’s burners,
or not waiting 5 minutes to allow the gas to clear if the
barbecue does not light, may result in an explosive flame-up
which can cause serious bodily injury or death.
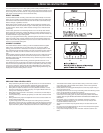
MAIN BURNER SNAP IGNITION
Note: Each control knob snap igniter creates a spark from the igniter electrode to the
burner lighting tube. You generate the energy for the spark by pushing in the control
knob and turning to “START/HI”. This will ignite each individual burner.
ƽ WARNING: Check hose before each use of barbecue for
nicks, cracking, abrasions or cuts. If the hose is found to
be damaged in any way, do not use the barbecue. Replace
using only Weber
®
authorized replacement hose. Contact
the Customer Service Representative in your area using the
contact information on our web site.
Log onto www.weber.com
®
.
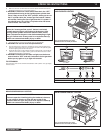
1) Open the lid.
1
2
4
5
3
* The grill illustrated may have slight
differences than the model purchased.
MAIN BURNER LIGHTING


