


Special offers from our partners!

Find Replacement BBQ Parts for 20,308 Models. Repair your BBQ today.
Buy Weber Grill Parts. It couldn't be easier. Find your Weber parts here.

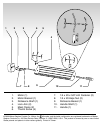
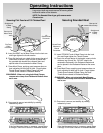
6. Set the Rotisserie Shaft on the cooking box. Slide the
squared end of the Rotisserie Shaft into the Motor.
7. Set the Handle Shaft on the cooking box. The groove
closest to the basket fits the Genesis Silver A gas
grill. This groove should rest in the cut-out in the
cooking box for the Genesis Silver A gas grill.
OR
Set the Handle Shaft on the cooking box. The groove
closest to the handle fits the Genesis Silver B, C, all
Golds, and all Platinum gas grills. This groove
should rest in the cut-out in the cooking box for the
Genesis Silver B, C, all Golds, and all Platinum gas
grill.
8. Place Rotisserie in grill and allow to rotate a few
turns. If food shrinks and/or becomes unsecure, re-
adjust Meat Clamp as required to secure food in
Rotisserie basket.
9. Remove Rotisserie with food from cooking box before
preheating. Preheat barbecue for 10 minutes with lid
down. Follow cooking instructions in your Weber Gas
Barbecue cookbook and adjust the burners as
needed.
10. Return rotisserie to the cooking box.
11. Turn the motor on and begin cooking.
12. Check on Meat Clamps periodically making sure
clamps are securely holding food in place.
ƽCAUTION: Re-adjustment of Meat Clamp may be
required more than once during cooking due to
food shrinkage.
ƽWARNING: Rotisserie is metal and will be hot.
Wear oven mits to protect hands during Meat
Clamp adjustment and movement of
Securing Whole Chicken/Fowl Meat
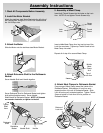
2. Insert STRAIGHT end of Meat Clamp into the Lock
Arm and finger tighten the Thumb Screws.
3. Due to the unique design of the basket; roasts, whole
chickens, leg of lamb, etc., DO NOT need to be
centered or balanced in the Rotisserie Basket and
can be placed in the Rotisserie Basket at the same
time.
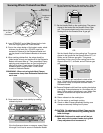
4. When cooking chicken/fowl, the wings should be
folded under its body and positioned in the Rotisserie
Basket with breast side up. Then press Meat Clamp,
applying good pressure,down on food, adjusting for
best grip on food. Finger tighten Thumb Screw
closest to Meat Clamp first then Thumb Screw
closest to Rotisserie Basket.
ƽWARNING: When not using both Meat Clamps,
remove extra clamp from Rotisserie Basket when
not in use.
5. Once meat is secure, test stability by rotating
rotisserie by hand.
If the food becomes loose or unsecure, repeat Steps
4 through 5 until food is secure in Rotisserie Basket.
Whole Chicken
or Fowl
Placement
Bent end of
Meat Clamp
Straight end
of Meat
Clamp