


Special offers from our partners!

Find Replacement BBQ Parts for 20,308 Models. Repair your BBQ today.
Buy Weber Grill Parts. It couldn't be easier. Find your Weber parts here.

24
www.weber.com
®
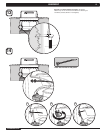
Gas suPPlY
1
1
c
c
a
b
d
d
f
f
e
e
1
2
1
1
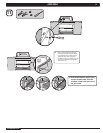
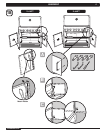
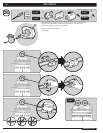
CONNECT GAS SUPPLY
A 58 inch (147.32 cm) corrugated gas line is supplied with the grill. This line needs to
pass through the gas inlet opening to the main gas supply.
1) Connect the corrugated gas line to the regulator (a). Use the 1/2” (12.7 mm) flared
gasket (1) to ensure proper seal.
(b) Shows the gas line and regulator assembled.
2) Uncap the flare fitting connection off the regulator.
3) Hard pipe the gas supply to the inlet of the regulator. Refer to “Typical Gas Supply
Installation”.
4) Connect the corrugated gas line to the manifold located on the right hand side of
grill under the control panel. Use the 1/2” (12.7 mm) flared gasket (1) to ensure
proper seal.
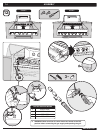
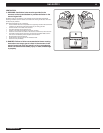
m DANGER
Do not use an open flame to check for gas leaks. Be sure
there are no sparks or open flames in the area while you
check for gas leaks. This will result in a fire or explosion
which can cause serious bodily injury or death, and damage
to property.
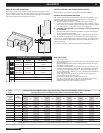
TEST CONNECTIONS
All connections and joints must be thoroughly tested for leaks in accordance with local
codes and all listed procedures in the latest edition of the National Fuel Gas Code ANSI
Z223.1/NFPA 54, Natural Gas and Propane Installation Code, CSA B149.1, or Propane
Storage and Handling Code, B149.2, or the Standard for Recreational Vehicles, ANSI A
119.2/NFPA 1192, and CSA Z240 RV Series, Recreational Vehicle Code, as applicable.
coNNectioN chart
1
Top View (Close-up)
2
Typical Natural Gas Pipe Routing
a
Connecting Corrugated Gas Line to the Regulator
b
Gas and Regulator Connected
c
Hard piped gas supply
d
Cap (Optional Side Burner)
e
Corrugated Gas Line to Manifold
f
Regulator