


Special offers from our partners!

Find Replacement BBQ Parts for 20,308 Models. Repair your BBQ today.
Buy Weber Grill Parts. It couldn't be easier. Find your Weber parts here.
pg5
ANNUAL MAINTENANCE
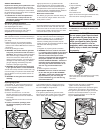
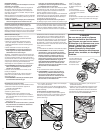
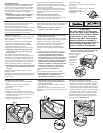
Inspection and cleaning of the Spider/Insect screen
To inspect the spider/insect screen, remove the
control panel. If there is dust or dirt on the screen,
remove the burner for cleaning the screen. Brush
the spider/inspect screen, lightly, with a soft bristle
brush (i.e. an old toothbrush).
ƽ CAUTION: Do not clean the spider/insect
screen with hard or sharp tools. Do not
dislodge the spider/insect screen or enlarge
the screen openings.
Lightly tap the burner to get debris and dirt
out of the burner tube. Once the spider/insect
screen and burner is clean replace the burner. If
the spider/insect screen becomes damaged or
cannot be cleaned, call Weber-Stephen Products
Customer Service for replacement parts.
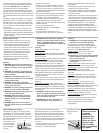
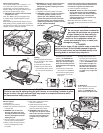
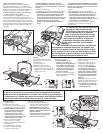
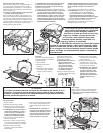
Main Burner Flame Pattern
The Weber
®
gas grill burner has been factory set
for the correct air and gas mixture. The correct
flame pattern is shown.
1) Burner tube
2) Tips occasionally
flicker yellow
3) Light blue
4) Dark blue
If the flames do not
appear to be uniform throughout the burner tube,
follow the burner cleaning procedures.
Check for gas leaks
After a period of nonuse, we recommend that you
perform the following maintenance procedures for
your safety.
• Inspect the burner for correct flame pattern.
Clean if necessary, following the procedures
outlined in the “General Maintenance” section of
this manual.
• Check all gas fittings for leaks.
ƽ WARNING: You should check for gas leaks
every time you disconnect and reconnect a
gas fitting. Note: All factory-made connections
have been thoroughly checked for gas leaks.
The burners have been flame tested. As a
safety precaution however, you should recheck
all fittings for leaks before using your Weber
®
gas grill. Shipping and handling may have
loosened or damaged a gas fitting.
ƽ WARNING: Perform these leak checks even
if your grill was dealer- or store-assembled.
You will need a soap and water solution and a rag
or brush to apply it. To perform leak checks make
sure the Burner is in the off position and turn on
gas supply.
ƽ WARNING: Do not ignite burner while leak
checking.
Check for leaks by wetting the connections with
the soap and water solution and watching for
bubbles. If bubbles form, or if a bubble grows,
there is a leak. Note: Since some leak test
solutions, including soap and water, may be
slightly corrosive, all connections should be rinsed
with water after checking for leaks.
Check:
1) Regulator to propane cylinder connection.
ƽ WARNING: If there is a leak at connection
(1), remove propane cylinder. Do not operate
grill. Use a different propane cylinder and
recheck for leaks with soap and water
solution. If a leak persists after retightening
the propane cylinder, turn OFF the gas.
DO NOT OPERATE THE GRILL. Contact the
Customer Service Representative in your
area using the contact information on our
web site. Log onto www.weber.com
®
.
Check:
2) Valve to-regulator connections.
ƽ WARNING: If there is a leak at connection
(2) turn OFF the gas. DO NOT OPERATE
THE GRILL. Contact the Customer Service
Representative in your area using the
contact information on our web site. Log
onto www.weber.com
®
.
When leak checks are complete, turn gas supply
OFF at the source and rinse connections
with water.
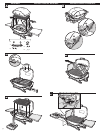
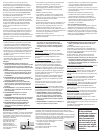
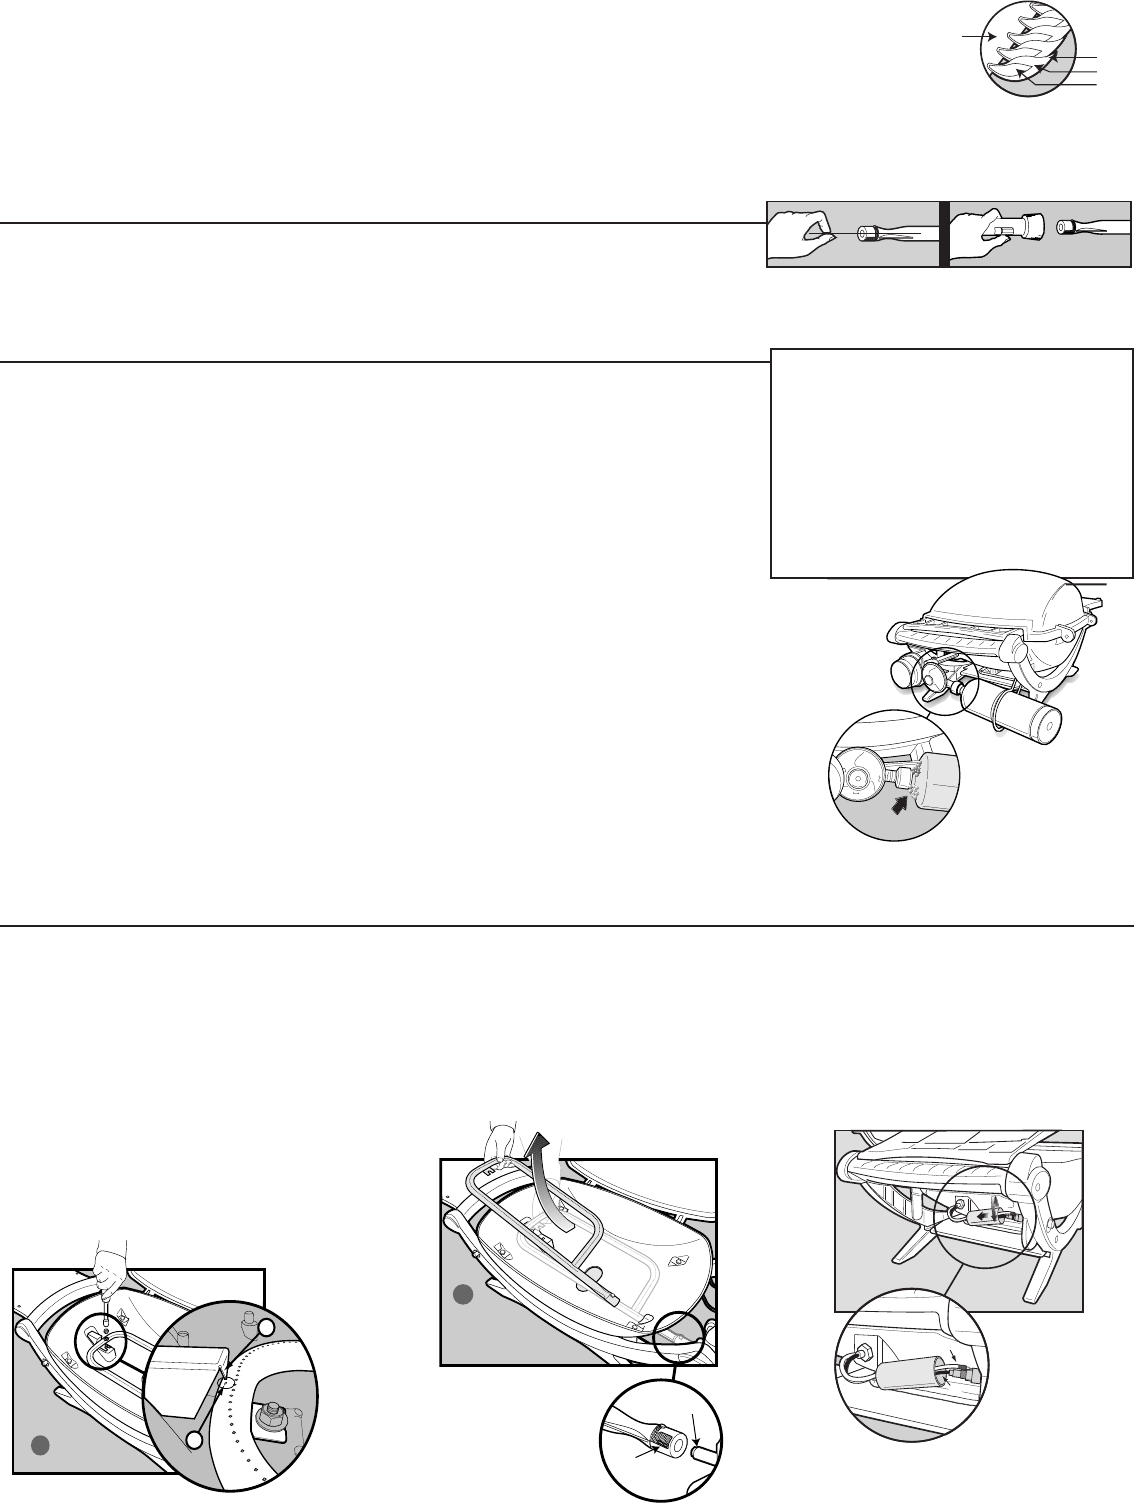
Replacing Burner Tube
1) Your Weber
®
Q
™
grill must be OFF and cool.
2) Unscrew and remove propane cylinder from
the valve/regulator assembly.
3) Open the lid.
4) Remove cooking grate.
5) Unscrew and remove the 1/4 x 20 inch
stainless steel hex nut and stainless steel
washer that holds the burner tube inside the
cook box(a).
6) Carefully slide the burner tube out from the
cook box.
ƽ Caution: The burner opening(1) must
be positioned properly over the valve
orifices(2).
7) To reinstall the burner, reverse 5) through 7).
Make sure the igniter port hole(A) lines up with
the arrow tab(B) on the igniter box.
Ignition System Operations
If the ignition system fails to ignite the burner,
light the burner with a match. If the burner lights
with a match, then check the ignition system.
• Check that both the white(1) and black(2)
ignition wires are attached properly.
• Check that the ignition button pushes the igniter
(button) down, and returns to the up position.
If the ignition system still fails to light, Contact the
Customer Service Representative in your area
using the contact information on our web site.
Log onto www.weber.com
®
.
Main Burner Cleaning Procedure
Turn off the gas supply. Remove the burner.
(See Replacing Burner Tube.)
Look inside the burner with a flashlight.
Clean the inside of the burner with a wire (a
straightened-out coat hanger will work).
Check and clean the air shutter opening at the
ends of the burner. Check and clean the valve
orifice at the base of the valve. Use a Steel bristle
brush to clean outside of burner. This is to make
sure all the burner ports are fully open.
ƽ CAUTION: Do not enlarge the burner ports
when cleaning.
ƽ DANGER
Do not use an open flame to check
for gas leaks. Be sure there are no
sparks or open flames in the area
while you check for leaks. Sparks
or flames will result in a fire or
explosion, which can cause serious
bodily injury or death, and damage
to property.
(2)
(3)
(4)
(1)
1
(a)
(a)
(a)
A.
B.
2
(2)
(1)
1).
1.
2.