


Special offers from our partners!

Find Replacement BBQ Parts for 20,308 Models. Repair your BBQ today.
Buy Weber Grill Parts. It couldn't be easier. Find your Weber parts here.

11
Refilling the LP tank
We suggest that you refill before the fuel scale indicator
reaches “E.”
Note - If you run out of fuel, check the indicator setting
and/or adjust the fuel scale indicator setting with the
scale setting wing nut while the tank is empty so you do
not run out again.
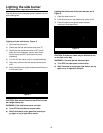
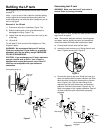
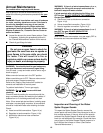
Removal of the LP tank
1) Close tank valve (turn clockwise). Figure 7 (a).
2) Slide the collar back on the quick disconnect to
disengage the fitting. Figure 7 (b).
3) Loosen tank lock wing nut and turn tank lock up out
of the way.
4) Lift tank off.
To refill take LP tank and tank filler adapter to a "Gas
Propane" dealer.
WARNING: We recommend that your LP tank be
filled at an authorized LP gas dealer, by a qualified
attendant, who fills the tank by weight. IMPROPER
FILLING IS DANGEROUS.
CAUTION: If you exchange your LP tank, make sure
you get a similar tank in return. Your LP tank is
equipped with a quick-disconnect valve. Other LP
tanks are not compatible with your barbecue
connection.
Connecting the LP tank
WARNING: Make sure that the LP tank valve is
closed. Close by turning clockwise.
Scale setting wing nut
Tank lock
wing nut
Tank valve
(a)
(b)
Figure 7
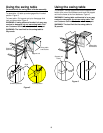
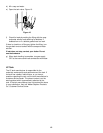
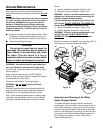
F
E
Figure 8
You will need: LP tank, a soap and water solution and a
rag or brush to apply it.
Note - Since some leak test solutions, including soap
and water, may be slightly corrosive, all connections
should be rinsed with water after checking for leaks
a) Lift and hook the tank onto the fuel scale.
b) Loosen the tank lock wing nut. Swing the tank lock
down. Tighten the wing nut. Figure 8.
DANGER
Do not use an open flame to check for
gas leaks. Be sure there are no sparks or
open flames in the area while you check
for leaks. This will result in a fire or
explosion which can cause serious bodily
injury or death, and damage to property.
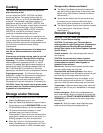
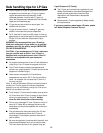
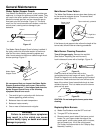
Collar
c) Connect the hose to the tank. Route the hose so it
does not interfere with the scale indicator rod. Slide
back the collar of the quick disconnect on the tank
valve. Figure 9 (a). Push the male fitting of the
regulator into the quick disconnect, and maintain
pressure. Slide the collar closed. Figure 9 (b). If it
does not engage or lock, repeat procedure. Gas will
not flow unless the quick disconnect is properly
engaged.
Male fitting
Regulator
Collar
Quick disconnect
engaged
Figure 9
(a)
(b)