


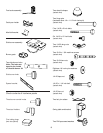
Special offers from our partners!

Find Replacement BBQ Parts for 20,308 Models. Repair your BBQ today.
Buy Weber Grill Parts. It couldn't be easier. Find your Weber parts here.

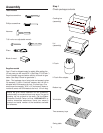
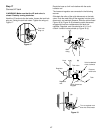
Step 7
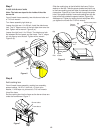
Install side burner locks
Note: The locks are taped to the inside of the side
burner lid.
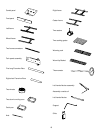
You will need: frame assembly, two side burner locks and
a 7/16 inch wrench.
Turn frame assembly right side up.
Loosen the right rear 1/4 x 20 bolt. Install the side burner
lock. The “U” shape cut out of the lock slips down over the
bolt. Tighten with a wrench. Figure 6 (a).
Loosen the right front 1/4 x 20 bolt. The side burner lock
fits between the front panel and the frame. The “U” shape
cut out slips up over the bolt. Tighten with a wrench.
Figure 6 (b).
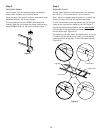
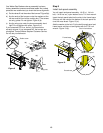
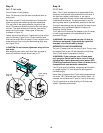
Burner tubes
Figure 7
Frame brace
Step 8
Add cooking box
You will need: frame assembly, cooking box assembly,
spacer bracket, 1/4-20 x 2 inch bolt, 1/4 inch nylon
washer, 1/4-20 keps nut, pliers and a 7/16 inch wrench.
Uncoil the hose.
Set the cooking box into the frame so the burner tubes are
under the frame brace. Figure 7.
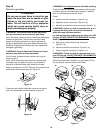
Figure 6
(a)
Slide the cooking box to the left within the frame. Put the
washer on the bolt. Take the spacer bracket and hold it up
to the frame making sure both tabs fit underneath the frame
cross piece. Figure 8 (a). Insert the bolt through the center
hole in the spacer bracket, frame and cooking box with the
head of the bolt outside the spacer bracket. Figure 8 (b).
Add keps nut. Tighten by holding the bolt with pliers while
you tighten the nut with the 7/16 inch wrench.
Figure 8
Frame cross piece
Tab
Spacer
bracket
Keps
nut
Bolt
Nylon
washer
(b)
(a)
(b)
12