


Special offers from our partners!

Find Replacement BBQ Parts for 20,308 Models. Repair your BBQ today.

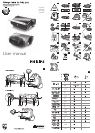
ENGLISH
Introduction
Congratulations on your purchase and welcome to Philips! To fully
benet from the support that Philips offers, register your product at
www.philips.com/welcome.
General description (Fig. 1)
A Grill (HD4407/HD4467 only)
1 Red temperature light
2 Temperature control
3 Grilling plates
4 Fixing clips of grilling plates
5 Cool-touch handgrips
6 Drainage groove
7 Storage hook for grease tray
8 Grease tray
9 Cord storage facility
B Grill (HD4408/HD4469 only)
1 Red power-on light
2 Green ready-to-cook light
3 Temperature control
4 Grilling plates
5 Fixing clips of grilling plates
6 Cool-touch bracket
7 Cool-touch handgrip
8 Drainage groove
9 Timer button
10 Timer display
11 Grease tray
12 Cord storage facility
Important
Read this user manual carefully before you use the appliance and save it for
future reference.
Danger
- Do not immerse the appliance or the mains cord in water or any other
liquid.
Warning
- Check if the voltage indicated on the appliance corresponds to the local
mains voltage before you connect the appliance. Check the type plate
on the appliance for information on voltage and wattage.
- If the mains cord is damaged, you must have it replaced by Philips, a
service centre authorised by Philips or similarly qualied persons in
order to avoid a hazard.
- This appliance can be used by children aged 8 or over and by persons
with reduced physical, sensory or mental capabilities, or lack of
experience and knowledge, provided they have been given supervision
or instruction concerning use of the appliance by a person responsible
of their safety.
- Children should be supervised to ensure that they do not play with the
appliance.
- Keep the appliance and its mains cord out of the reach of children
younger than 8 when the appliance is switched on or is cooling down.
- Keep the mains cord away from hot surfaces.
- Do not let the appliance operate unattended.
Caution
- Only connect the appliance to an earthed wall socket.
- Put the appliance on a at, stable surface with sufcient free space
around it.
- Always preheat the grilling plates before you put any food between
them.
- The accessible surfaces may become hot when the appliance is
operating (Fig. 2).
- Be careful of spattering fat when you grill fatty meat or sausages.
- Always turn the temperature control to 0 before you unplug the
appliance.
- Always unplug the appliance after use.
- Always clean the appliance after use.
- Let the appliance cool down completely before you remove the grilling
plates, clean the appliance or put it away.
- Never touch the grilling plates with sharp or abrasive items, as
this damages the non-stick surface.
- Make sure you reassemble the grilling plates properly after you
have removed them.
- This appliance is intended for normal household use only. It is not
intended for use in environments such as staff kitchens of shops, ofces,
farms or other work environments. Nor is it intended to be used
by clients in hotels, motels, bed and breakfasts and other residential
environments.
- This appliance is not intended to be operated by means of an external
timer or a separate remote-control system.
- If the appliance is used improperly or for professional or semi-
professional purposes or if it is not used according to the instructions in
the user manual, the guarantee becomes invalid and Philips refuses any
liability for damage caused.
This Philips appliance complies with all standards regarding electromagnetic
elds (EMF). If handled properly and according to the instructions in this
user manual, the appliance is safe to use based on scientic evidence
available today.
Before first use
1 Remove the insert between the grilling plates and remove any
stickers.
2 Wipe the outside of the appliance with a damp cloth.
3 Clean the grilling plates thoroughly (see chapter ‘Cleaning’).
Note: The appliance may produce some smoke when you use it for the rst
time. This is normal.
Using the appliance
Three grilling positions
- Contact grill position (Fig. 3)
This position is especially suitable for quick high-temperature grilling on both
sides (rump steaks, hamburgers etc.) and for making toasted sandwiches or
paninis.
Note: Both grilling plates are in contact with the food.
- Oven grill position (Fig. 4)
This is the ideal position to grill and cook au gratin at the same time. The
oven grill position is also suitable for the preparation of all kinds of ‘open’
toasts, e.g. with egg, tomato, peppers and/or onion rings, covered with
cheese.
Note: The upper grilling plate must not touch the food.
- Barbecue grill position (Fig. 5)
In this position, the grill offers a large grilling surface for the preparation of
all kinds of snacks, such as shashlik, satay, vegetables, fruits etc.
1 Fully unwind the mains cord from the storage facility in the hinges of
the appliance (Fig. 6).
2 Make sure the grill is closed. Then put the plug in the wall
socket (Fig. 7).
, HD4408/HD4469 only: The red power-on light goes on to indicate
that the grill is connected to the mains.
3 Turn the temperature control to the temperature setting that is
appropriate for the ingredients to be grilled. See the food table at the
beginning of this booklet.
, The red light indicates that the grill is heating up.
Never let the appliance operate unattended.
4 Let the appliance heat up.
- HD4408/HD4469 only: Wait until the green ready-to-cook light goes
on.
- HD4407/HD4467 only: Wait until the red temperature light goes out.
5 Open the grill to put the ingredients on the grilling plate or plates.
Be careful: the grilling plates are hot.
- Contact grill and oven grill positions: open the grill halfway (Fig. 8).
- Barbecue grill position: open the grill halfway and pull the upper grilling
plate up to its highest position (1). Then put the grill in open position
(2) (Fig. 9).
6 Place the grease tray under the drainage groove to collect fat or
juice. (Fig. 10)
7 Place the ingredients on the grilling plate or plates (Fig. 11).
For an optimal result, place the ingredients in the centre of the grilling plate
or plates.
The grilling time depends on the type of ingredients, their thickness and
your personal taste. See the food table at the beginning of this booklet
for recommended grilling times.
Note: During the grilling process, the green ready-to-cook light goes out
(HD4408/HD4469 only) or the temperature light goes on (HD4407/HD4467
only) from time to time to indicate that the grill is heating up to the preset
temperature setting.