


Special offers from our partners!

Find Replacement BBQ Parts for 20,308 Models. Repair your BBQ today.

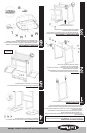
Outdoor Charcoal Grill Model No. CBC608A
Contact 1.800.762.1142 for assistance. Do not return to place of purchase.
page no.
5
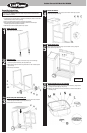
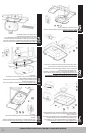
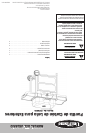
Step
10
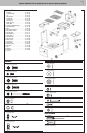
Attach control panel and adjustable knob
A. Attach control panel to bottom bowl using 2 sets of medium screw (C), large lock
washer (N), and large washer (K).
B. Attach adjustable knob to adjustable grid kit using extra small screw (A).
Step
8
Attach charcoal support rods and adjustable grid kit
A. Attach adjustable grid kit to bottom bowl using 2 sets of small screws (B),
heat resistant washers (L), small washers (J), small lock washers (M), and cap
nuts (G).
Note: Insert tabs on top of adjustable knob into bottom bowl.
B. Insert charcoal support rods into bottom bowl.
C. Insert end of charcoal support rods into slots beside adjustable knob.
Step
11
Attach top lid and ash receiver
A. Insert the top hinges into the bottom hinges. Secure with 2 sets of pins (O) and
cotter pins (P).
Note: If top hinge does not fit into the bottom hinge, gently squeeze top hinge tabs
together.
B. Slide ash receiver onto slide from backside.
Step
12
Insert warming rack
A. Slide warming rack into holes in lid and bottom bowl.
Note: Look for corresponding holes on side of lid. Insert short wire ends into lid
holes, one side at a time. Position warming rack legs into slots on grill body sides.
B. Cut zip tie on warming rack.
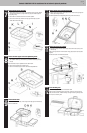
Step
7
Attach bottom hinges and slide
A. Attach bottom hinges to bowl using 2 sets of medium screws (C), large washers
(K), heat resistant washers (L), large washers (K), large lock washers (N), and
large wing nuts (I).
B. Insert slide onto underside of bowl. Turn to lock into position.
C. Secure slide to bowl using medium screw (C), large washer (K), large lock
washer (N) and large wing nut (I).
Step
9
Attach bottom bowl
Attach bowl to cart frame using 4 sets of large screws (D), large lock washers (N),
and large washers (K).