


Special offers from our partners!

Find Replacement BBQ Parts for 20,308 Models. Repair your BBQ today.

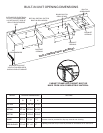
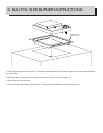
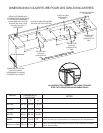
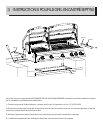
6. BUILT-IN ACCESSORY DRAWER INSTRUCTIONS
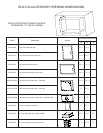
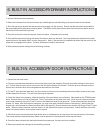
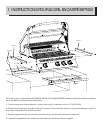
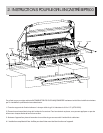
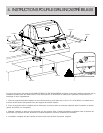
7. BUILT-IN ACCESSORY DOOR INSTRUCTIONS
1. Unpack the drawer frame assembly.
2. Remove the drawers from the enclosure by fully extending them and then lifting up to remove them from the slides.
3. Shim the opening to ensure that the enclosure fits snuggly into the opening. Ensure that the side shims are located at
the same height as the enclosure mounting holes. The bottom of the opening may need to be shimmed as well to ensure
that the front of the enclosure is plumb.
4. Once the enclosure is level and square, fasten into place. (Fasteners not included).
5. Re-install the drawers by tipping the back of the drawer down into the slide. Once the wheels are inserted into the slide,
lower the front of the drawer until it is level, then push in. Note: if the enclosure is installed with shims that are too thick, the
wheel will not engage into the slide. The shim thickness will need to be reduced.
6. Remove the protective coating from all remaining surfaces.
1. Unpack the door and frame.
a. For the curved stainless steel doors, remove the door(s) from the frame by lifting the door while holding on to the pivot
rod. This will allow the pivot rod to come out of the hole on the bottom of the frame. Once the pivot is removed from the
bottom hole, the entire door can be dropped and removed from the frame.
b. For the PF style stainless steel door, the door needs to be removed by loosening the center philips screw on the hinge
furthest away from the door. This will allow the hinge to separate.
2. Center the frame in the opening. Mark the location of the pivot holes, top and bottom. Remember on the PT600 double
doors, there will be a pivot rod on both ends. The PF style doors do not have pivot rods. Once all pivot holes are marked,
remove the frame and using a 3/8” drill bit, drill out the clearance holes for the pivot rod. These clearance holes should be
at least 1/2” deep. After the holes are complete, you may once again center the frame in the opening. Starting with the
hinged side, shim between the frame and side wall of the opening. Ensure the shims are close to the hinge on the PF style
doors. When the frame side wall is plumb, fasten it to the cabinet with screws (not provided). Attach the other side of the
frame in the same fashion, ensuring the frame is square.
3. Other than on the curved stainless steel double door kit, fasteners are not required on the top and bottom of the frame.
The curved stainless steel double door frame must be fastened in the center both at the top and bottom.
4. Once the frame has been secured and checked for squareness, the door can be re-installed.
5. Remove the protective coating from all remaining surfaces.