


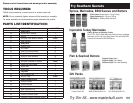

Special offers from our partners!

Find Replacement BBQ Parts for 20,308 Models. Repair your BBQ today.

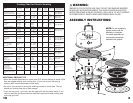
WET SMOKING
CONFIGURATION
Add water or favorite marinade to the
water bowl. Place wood chips or chunks
into the wood bowl. If you need to add
wood chips or chunks during cooking, add
them through the wood chip door.
DRY SMOKING
CONFIGURATION
Same as wet smoking, but do not add
liquid to water bowl. Wood chips or
chunks are still needed for dry smoking.
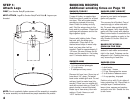
STEP 2:
Electric Component Assembly
FIRST, place Heat Shield/Ash Pan U in notch on top of Legs P.
Make sure side with reservoir is facing down.
NEXT, place attach Element Bracket S to Smoker Body F with Screws for
Element Bracket T.
NEXT, mount Electric Element R to Element Bracket. Make sure electric
element nodes go through holes in body first, and insulating rings on Electric
Element R fit into slots in Element Bracket S.
NEXT, mount Electric Controller Shield W to outside of Smoker Body F with
Screws for Electric Controller Shield X.
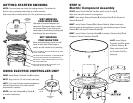
USING ELECTRIC CONTROLLER UNIT
FIRST, attach Electric Controller Unit U to smoker.
NEXT, plug cord into 110 volt current outlet only.
LAST, Turn control knob to desired temperature.
Indicator light will turn off on when desired
temperature is reached.
NOTE: Use Heat Indicator D on Dome A
to monitor temperature.
INDICATOR
LIGHT
CONTROL
KNOB
58
GETTING STARTED SMOKING
NOTE: The wood bowl can touch the heating element. This allows the
bowl to heat up, allowing wood chips or chunks to smoke.
Soak wood chips in water before use. This produces more smoke..
RACK PLACEMENT (BOTH RACKS G CAN BE USED
AT THE SAME TIME)
ADD WATER AND/OR
MARINADE
TO WATER BOWL N
(RACK AND WATER BOWL USE SAME BRACKET)
ADD WOOD TO WOOD BOWL 0 (BOWL CAN TOUCH
ELECTRIC ELEMENT R)
HEAT SHIELD/ASH PAN U (SITS DIRECTLY ON
NOTCHES ON TOP OF LEGS P)
ALWAYS
USE DOME
WHEN
SMOKING
LAST, mount Electric
Controller Unit V to nodes
of Electric Element R.
Make sure control Knob
on Controller Unit V is
facing up.