


Special offers from our partners!

Find Replacement BBQ Parts for 20,308 Models. Repair your BBQ today.
- 3 -
• Avoid heat accumulation. Do not lay aluminium
foil or other grilling utensils on the grill bars. An
accumulation of heat could destroy plastic parts
as well as the non-stick coating.
• Use the Table grill KH 1602 exclusively with the
supplied thermostat.
• Take the grill plate into use ONLY when it is lying
on the catchment pan.
• Detach the power plug and cable from the
appliance when it is not in use, when you detach
parts or before cleaning the appliance.
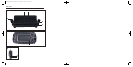
Operating Elements
q
Grill bars
w
Splatter protection shield
e
Connection for power cable with thermostat
r
Catchment pan
t
Heat-insulated handles
y
Heating element
u
Indicator lamp
i
Thermostat
Taking it into use
Before taking the table grill into use for the first time
clean it as described in the chapter “Cleaning and
care”.
Usage / grilling may only take place with the catch-
ment pan
r
intended for the purpose.
The voltage of the power source must tally with the
details given on the rating plate of the appliance.
Handling the grill
A good and even heat distribution is assured by the
integrated heating element
y
in the grill plate.
Cleaning is made easier by the non-stick coating,
which prevents the adhesion of grillables.
• Fill the catchment pan
r
up to the Max marking
with water (ca. 1.3 ltrs). By doing this, you avoid
having the fats dripping from the foodstuffs bur-
ning onto the appliance, thereby make cleaning
of the appliance afterwards easier.
• Install the splatter protection shield
w
at the rear
of the grill bars should you be grilling greasy
grillables. Additionally, it serves well as a wind-
break if being used outdoors: Insert the three
tenons of the splatter protection shield
w
into
the holes provided on one side of the grill bars
q
. To do this, the splatter protection shield
w
must be lightly flexed.
• Place the grill on an absolutely level and even
surface.
• Place the grill on a base material that is not
sensitive to heat.
• Check to ensure that the grill bars
q
are correctly
placed onto the catchment pan
r
(see Fig. Ạ).
• First insert the power cable with thermostat
i
into the appliance and then connect it to the
power source.
• Adjust the thermostat
i
to the desired tempera-
ture setting.The grill starts to warm up and the
indicator lamp
u
glows.
• As soon as the indicator lamp
u
goes out the
grill has reached the adjusted temperature and
is ready for use.
Take note
Subject to the ambient temperature, it can occur that
the control lamp
u
does not extinguish on thermo-
stat setting "M".
• The grill is ready for use after a heating-up pha-
se of ca. 15 minutes.
IB_KH1602_E42319_LB6.qxd 11.12.2008 8:31 Uhr Seite 3