


Special offers from our partners!

Find Replacement BBQ Parts for 20,308 Models. Repair your BBQ today.

13
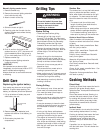
Using the rotisserie
For best cooking results, do not use main
grill burners when using the rotisserie.
The rotisserie system is designed to cook
food from the rear using intense, searing
infrared heat.
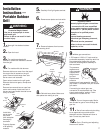
1. Remove warming shelf.
2. Mount rotisserie motor on the grill's
mounting bracket. Position it securely
into support bracket slots.
3. To load the spit rod, slide one of the
rotisserie forks onto the spit rod with
prongs facing away from handle.
4. Push spit rod through the center of the
food, then slide second rotisserie fork
into position.
5. Center the food and rotisserie forks on
spit rod and tighten wing nuts on the
rotisserie forks. If necessary, secure
loose food portions with butcher's
string only.
6. Once the food is positioned on spit rod,
place pointed end of rod into rotisserie
motor and lower spit rod onto supports
at either side of the grill.
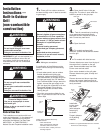
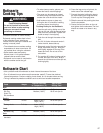
IMPORTANT: On Models KFGR292PSS,
KFGR382PSS and KBGN292PSS, remove the
handle from the spit rod
when using the side
burner. The handle will
get “HOT” and failure to
remove it will cause the
handle to crack and
melt.
7. Plug single-prong plug into rotisserie
motor.
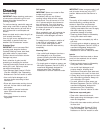
rotisserie
fork
motor
spit rod
rotisserie burner
8. Plug 3-prong plug into a grounded
3-prong outlet.
To avoid product damage when not using
the rotisserie, remove motor and store
indoors. Remove spit rod and forks. Store
out of reach of children.
Lighting the rotisserie burner
1. Push in and turn rotisserie burner knob
to “LITE”. You will hear a “snapping”
sound.
2. Push the red button in.
3. When rotisserie burner lights, continue
pressing the red button for another 5 to
10 seconds, and turn knob away from
“LITE” to “HI”.
IMPORTANT:
If the rotisserie burner does not light
immediately, turn the burner knob to “OFF”,
wait 5 minutes before relighting.
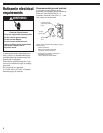
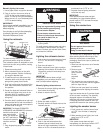
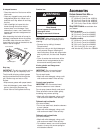
Electrical Shock Hazard
Plug into a grounded 3-prong outlet.
Do not remove ground prong.
Do not use an adapter.
Do not use an extension cord.
Failure to follow these instructions
can result in death, fire, or
electrical shock.
WARNING
Manually lighting rotisserie burner
1. Remove the manual lighting extension
from inside the drip tray.
2. Attach a match to the clip.
3. Strike the match to light it.
4. Carefully hold the lit match close to the
rotisserie burner.
5. Push in and turn the rotisserie burner
control knob to “LITE”.
6. Push in the red button above the
rotisserie burner control knob, the
burner will light immediately. Hold this
button in for 5 to 10 seconds, and turn
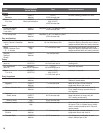
Using the smoker box
The smoker tray is designed for easy use.
After deciding which wood chips to use,
follow the instructions on wood chip
packaging. Small size chips or pellets are
recommended.
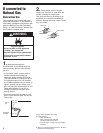
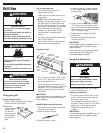
1. Slide box and chip cover out of smoker
compartment.
2. Remove cover
from box. Turn
cover over and
fill with
prepared
chips.
3. Turn smoker box over and place over
chip cover. Hold cover and box together
and turn right side up.
4. Slide box and cover back into smoker
compartment after lighting the smoker
burner.
Light the smoker burner 5 minutes ahead
of time to start it smoking. The specially-
designed smoker will smoke the food
while the grill burners or rotisserie cooks
it. Keeping the hood closed as much as
possible will maximize the smoking effect.
Lighting the smoker burner
1. Push in and turn smoker burner knob
to “LITE”. You will hear a “snapping”
sound.
2. When smoker burner lights, turn knob
away from “LITE” to “HI”.
IMPORTANT:
If the smoker burner does not light
immediately, turn the burner knob to “OFF”,
wait 5 minutes before relighting.
WARNING
Burn Hazard
Do not remove the smoker box
when grill is hot.
Doing so can result in burns.
knob away from “LITE” to “HI”.
7. Replace manual lighting extension
inside the drip tray.
IMPORTANT:
If the rotisserie burner does not light
immediately, turn the rotisserie burner
control knob to “OFF” and wait 5 minutes
before relighting.
chip cover
smoker box
Manually lighting the burners
1. Use a paper match to light the burners.
2. Push in and turn the burner knob to
“LITE” for the burner closest to the lit
match. The burner will light immediately.
When burner is lit, turn knob away from
“LITE” to desired setting
IMPORTANT:
If burner does not light immediately, turn the
burner knob to “OFF” and wait 5 minutes
before relighting.
If any burners do not light after attempting
to manually light them, contact the
KitchenAid Assistance Center.
remove
handle