


Special offers from our partners!

Find Replacement BBQ Parts for 20,308 Models. Repair your BBQ today.
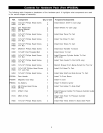
Beforeassemblingyourgasgrill,usethe parts
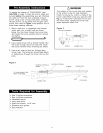
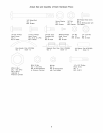
Figure 1
DRAWER CHANNEL
list to check that all necessary parts are included.
Inspect all parts for damage as you proceed. Do not
assemble or operate your grill if it appears damaged.
If you have questions during the assembly process, call
8am - 8pm CST, Monday through Friday,
1-888-317-7642
Remove the white PVC protective film from
stainless steel surfaces before assembly.
CAUTION:
While it is possible for one person to assemble
this gas grill, obtain assistance from another
person when handling some of the larger, heavier
pieces, especially the grill head.
Remove all cart parts, hardware, and grill head
from carton. Assemble the gas grill on a protective
work surface, such as the shipping box, to avoid
scratching surfaces. Refer to parts list and hard-
ware pack illustrations to help assemble your grill.
Assembling The Grill Cart
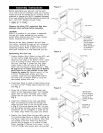
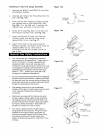
1. Position Bottom Shelf (Parts List Item #31) with
its front vertical ledge facing down. Before
attaching Cart Legs to the Bottom Shelf, make
sure its 2 holes for Door Stop are located in
the front. See Fig. 1. Install the Cart Legs-
Castor Side on the left side of the Bottom
Shelf, with the Drawer Channel facing in. The
90 degree lip on sides and back of Bottom
Shelf must be on the outside of the Side
Panels for proper fit. Secure using 2 of the
1/4"x1/2" Phillips head screws and nuts
provided. Install the Cart Legs-Wheel Side to
the other side of Bottom Shelf by using the
same-sized screws and nuts.
CARTLEGS
\
CASTOR
SEAT
HOLES FOR
DOOR STOP
Figure 2
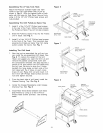
SEAT I
CASTOR
/ SIDE PANEL
BOTTOM SHELF
OF CABINET-
Parts List Item #3I
IMPORTANT:
The 90 degree
lip of Bottom
Shelf should be
on outside of
Side Panel.
REAR PANEL
SIDE PANEL
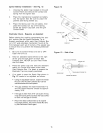
2. Install Rear Panel to inside of Side Panels using
3 of the 1/4"x1/2" Phillips head screws and nuts.
See Fig. 2.
3. Screw the 2 Castors into Castor Seats (see
bottom of Cart Legs-Castor Side). Turn threaded
castor stem by hand, clockwise until it stops.
Tighten with an Open-end 11/16" wrench. See
Fig. 2.
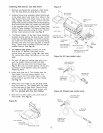
4. Install the 2 Wheels to the Cart Legs-Wheel
Side, by inserting the wheel bolt through the
wheel and axle hole on the cart leg as shown
in Fig. 2. Put spring washer and 3/8" nut onto
bolt and tighten securely using a size 4 phillips
screwdriver. Do not overtighten or wheel wilt not
turn freely. Snap Wheel Hub Caps onto wheels.
Figure 3
HOLES FOR
DOOR STOP
WHEEL
WHEEL HUB
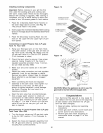
IMPORTANT:
The 90 degree
Shelf
should be on
outside of Rear
Panel.
/
/
OF
CABINET-Parts
List Item #53
5. Position Top Panel (Parts List Item #53) with its
front vertical ledge facing up. Before installing the
Top Panel, make sure its 2 holes for Door Stop
are located in the front. Place Top Panel into
position with 90 degree lip on outside of Rear
Panel. See Fig. 3. Secure firmly using 7 of the
1/4"xl/2" Phillips head screws and nuts provided.