


Special offers from our partners!

Find Replacement BBQ Parts for 20,308 Models. Repair your BBQ today.

INSTALLATION INSTRUCTIONS
69-2460EFS-03
CQ8000A Universal Hot Surface
Igniter Kit
APPLICATION
The CQ8000A Universal Hot Surface Igniter Kit is designed to
provide a robust field service replacement igniter in gas fired
appliances with Norton/St Gobain 120 VAC silicon carbide hot
surface igniters. The CQ8000A uses a 120 volt silicon nitride
igniter design with long life and high resistance to damage or
burn out in the appliance. The kit includes the specially
designed silicon nitride igniter and six different bracket
configurations to adapt the igniter to the specific appliance
application along with accessory parts to allow mounting and
wiring the igniter. Clear instructions and application templates
are provided to simplify selection of the proper bracket and
ease installation of the replacement.
BEFORE YOU START
1. Review this instruction sheet fully to ensure you are
familiar with the steps and information necessary to
complete the installation properly, including the
WARNING section on this page.
2.
Confirm the existing hot surface igniter has failed:
a. Run an appliance cycle and observe the installed
igniter.
b. If the igniter glows, the problem is not the igniter.
c. If the igniter does not glow during an ignition cycle:
(1) Unplug the igniter lead wires.
(2) Set a voltmeter’s scale to 300 VAC and connect
the voltmeter to the igniter harness.
(3) Run another cycle and confirm 120 VAC power
at the harness during the igniter warm up time.
3. Check the appliance construction and wiring diagram
(typically located on an appliance panel) and confirm
that the appliance does not use the hot surface igniter
as the flame sensor. Do not use the CQ8000A kit if the
existing igniter is also the flame sensor. Use an original
equipment part. The CQ8000A is not designed to be
used as a flame sensor.
4. If the appliance is a sealed combustion model,
determine if the existing hot surface igniter ceramic is
part of the sealing of the burner box. If it is, check
carefully to determine if this kit will allow the proper
appliance function.
5. Confirm the kit components:
a. six brackets stamped A, B, C, D, E, and F
b. one hot surface igniter with wiring leads
c. two wire nuts and a thread forming screw
6. The CQ8000A should not be handled by the black
silicon nitride igniter. Use care to handle the CQ8000A
by the ceramic casing or the bracket.
INSTALLATION
When Installing This Product…
1.
Read these instructions carefully. Failure to follow them
could damage the product or cause a hazardous condition.
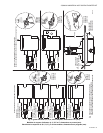
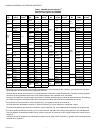
2.
Check the cross-reference table on page 4 and the tem-
plates (Fig. 1 and Fig. 2) to make sure the proper igniter
bracket is used for your application.
3.
This product is intended for installation by a trained and
experienced service technician. If a service technician is
not available, the individual installing this product must
be knowledgeable in the design, construction, and
operation of the gas fired appliance being serviced.
4.
After installation is complete, check out appliance
operation as provided in these instructions.
WARNING
Fire or Explosion or Electrical Shock Hazard.
Can cause severe injury, death or property
damage.
1. Never install where water can flood, drip or
condense on the igniter or its controller.
2. Liquefied petroleum (LP) gas is heavier than air
and will not naturally vent upward.
— Do not operate electric switches, lights, or
appliances until you are sure the appliance area
is free of gas.
3. Disconnect power supply before beginning wiring
or making wiring connections to prevent electrical
shock or equipment damage.
4. The CQ8000A is NOT designed to replace silicon
carbide hot surface igniters in residential gas ovens or
residential clothes dryers. Use of this product in a
residential gas oven or residential gas clothes dryer
can result in severe injury, death, or property damage.
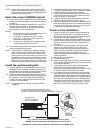
Remove the old igniter assembly
1.
Turn off electrical power supply external to the appliance.
2.
Turn off gas supply to the appliance.
3.
Set thermostat to the lowest setting or OFF.
4.
Remove the appliance panel to expose the burner area.
If necessary remove the burner box panel to expose the
installed igniter.
5.
Disconnect the installed igniter from the appliance wiring
harness and move the wiring harness out of the way.
6.
Carefully review the location of the installed igniter in the
appliance. Pay attention to where the igniter is located
relative to the burners and other parts of the appliance.
This will help confirm the location of the new igniter for
installation.
7.
Locate and remove the screw(s) holding the installed
igniter or igniter bracket assembly in place. Remove the
installed igniter very carefully to avoid damaging it.
Retain the screw(s) for re-installation.