


Special offers from our partners!

Find Replacement BBQ Parts for 20,308 Models. Repair your BBQ today.
Page 5SKU 90160
Assembly (continued)
Note: You will need a 7/16” open end wrench and a flat screwdriver (both not included).
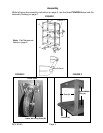
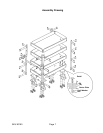
Refer to FIGURES 1, 2, & 3, on page four and the Assembly Drawing on page 7.
1. Bolt the Bottom Tray (B) to all four Posts (C) using (16) 1/4-20 x 1/2” machine screws and
nuts.
2. Working your way up the Posts (C) from the bottom, attach the two middle
Upper/Middle Trays (A) to the posts using (16) 1/4-20 x 1/2” machine screws and nuts per
tray. Do not attach two of the bolts on each side for the Handle. See “Position 1” in
FIGURE 1 on page 4.
3. Bolt the Upper, Upper/Middle Tray (A) to the Posts (C) using (16) 1/4-20 x 1/2” machine
screws and nuts.
Note: When mounting the Castors (next step) make sure the Swivel Castors (F) are mounted
on the same side as the Handle.
4. Refering to the Detail insert on the Assembly Drawing on page 7 and FIGURE 2), place
one of the Castor Mounting Plates (D) between the Castor Plate ( FIGURE 2) and the
Bottom Tray (B). Hold one of the Swivel Castors (F) so that the holes match up and attach
with (16) 1/4-20 x 1/2” machine screws, (16) split washers, and (16) nuts (see the Detail insert
on the Assembly Drawing on page 7 and FIGURE 2). Repeat with the other
Swivel Castor (F) making sure it is on the same side as the Handle will be.
5. Mount the two Rigid Castors (E) on the opposite side using the same instructions above
in number 4.
6. At “Position 1” in FIGURE 1 on page 4, bolt one Handle Bracket (G) through the Post (C)
and the Upper/Middle Tray (A) and secure it using 1/4-20 x 1/2” machine screws and nuts.
(See Handle Detail in FIGURE 1).
7. Insert the Handle Tube (H) in the attached Handle Bracket (G). Then, place the second
Handle Bracket (G) onto the Handle Tube (H) and bolt to the other side of the
Post (C) and the Upper/Middle Tray (A) and secure it using 1/4-20 x 1/2” machine screws
and nuts.
8. Tighten all nuts and bolts.
Operation
For maximum safety:
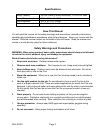
1. Do not exceed the weight capacities listed in the Specifications chart on page 2.
2. Do not allow children or pets to ride on the Cart.
3. Only operate and park the Cart on flat, dry, level surfaces.
4. This Cart was designed to be pushed by an operator, walking slowly behind the unit. Make
sure the Swivel Castors (F) are on the same side as the Handle.
Warning! Weight on all four of the Trays must be evenly distributed and balanced.