


Special offers from our partners!

Find Replacement BBQ Parts for 20,308 Models. Repair your BBQ today.

SKU 65939 For technical questions, please call 1-800-444-3353. Page 3
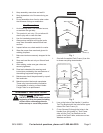
Repeat for the other side.4.
When attaching the second Tool Tray a.
Bracket, slide the Tool Tray (3) onto the
metal pegs on the Brackets. These Brackets
hold the Tool Tray in place.
The Tool Tray should be able to swing freely b.
as the cart is tilted.
Slide the Wheels (5) onto the Axle ends and 5.
secure in place with washers and split keys.
The Axle (6) is attached to the back-bottom 6.
of the Tank Frame with two U-Bolts and four
washers and nuts onto the Axle Bracket (7).
There are two mounting height available:a.
Upper mounting position - The Wheels •
should be slightly off the ground when the
Cart is standing straight up.
Lower mounting position - The wheels are •
always on the ground supporting the cart.
Go over all screws and nuts making sure 7.
they are tightly fastened and secure.
MAINTENANCE
Periodicaly check welds for cracks and for 1.
loose parts or damage.
Check wheel tightness and tire pressure.2.
Lubricate wheels if they begin to bind or 3.
squeak.
Keep dry and free of rust. 4.
STORAGE AND SAFETY
PRECAUTIONS
Store tanks away from heat and ignition 1.
sources.
Consult gas supplier on safest way to trans-2.
port and store gases.
Cart is designed for a maximum of 48" tanks.3.
Store and use on at, level, hard surface.4.
When done welding, check that all gas 5.
valves are closed tightly.
PLEASE READ THE FOLLOWING
CAREFULLY
THE MANUFACTURER AND/OR DISTRIBUTOR HAS
PROVIDED THE PARTS LIST AND ASSEMBLY DIAGRAM
IN THIS DOCUMENT AS A REFERENCE TOOL ONLY.
NEITHER THE MANUFACTURER OR DISTRIBUTOR
MAKES ANY REPRESENTATION OR WARRANTY OF ANY
KIND TO THE BUYER THAT HE OR SHE IS QUALIFIED
TO MAKE ANY REPAIRS TO THE PRODUCT, OR THAT
HE OR SHE IS QUALIFIED TO REPLACE ANY PARTS OF
THE PRODUCT. IN FACT, THE MANUFACTURER AND/OR
DISTRIBUTOR EXPRESSLY STATES THAT ALL REPAIRS
AND PARTS REPLACEMENTS SHOULD BE UNDERTAKEN
BY CERTIFIED AND LICENSED TECHNICIANS, AND NOT
BY THE BUYER. THE BUYER ASSUMES ALL RISK AND
LIABILITY ARISING OUT OF HIS OR HER REPAIRS TO THE
ORIGINAL PRODUCT OR REPLACEMENT PARTS THERETO,
OR ARISING OUT OF HIS OR HER INSTALLATION OF
REPLACEMENT PARTS THERETO.
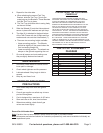
PARTS LIST & ASSEMBLY
DIAGRAM
Part Description Qty.
1. Handle 1
2. Tool Tray Bracket 2
3. Tool Tray 1
4. Tank Frame 1
5. Wheels (40 PSI) 2
6. Axle 1
7. Axle Bracket 2
8. U-Bolt 2
9. Screws (2" x 3/16") 4
10. Hex Screw 2
11. Bafe Board 1
Record Serial Number Here:
Note: If product has no serial number, record month and year of purchase instead.
Note: Some parts are listed and shown for illustration purposes only, and are not available individually as
replacement parts.