


Special offers from our partners!

Find Replacement BBQ Parts for 20,308 Models. Repair your BBQ today.
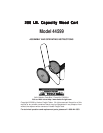
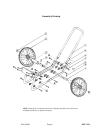
SKU 44599 Page 3
9. Stay alert. Watch what you are doing, use common sense. Do not operate
any product when you are tired.
10. Check for damaged parts. Before using any product, any part that appears
damaged should be carefully checked to determine that it will operate
properly and perform its intended function. Check for alignment and binding
of moving parts; any broken parts or mounting fixtures; and any other
condition that may affect proper operation. Any part that is damaged should
be properly repaired or replaced by a qualified technician.
11. Do not operate product if under the influence of alcohol or drugs.
Read warning labels on prescriptions to determine if your judgment or
reflexes are impaired while taking drugs. If there is any doubt, do not operate
the product.
Warning: The warnings, cautions, and instructions discussed in this instruc-
tion manual cannot cover all possible conditions and situations that may oc-
cur. It must be understood by the operator that common sense and caution
are factors which cannot be built into this product, but must be supplied by
the operator.
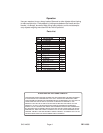
Unpacking
When unpacking, check to make sure all parts shown on page 4 are included. If
any parts are missing or broken, please call Harbor Freight Tools at the number
on the cover of this manual.
Assembly Instructions
NOTE: All parts below refer to the parts listed on page 4 of this manual.
1. As shown in the diagram on page 5, position the U-Handle [1] inside the
grooves of the Axle & Frame [4]. Attach the U-Handle to the Axle & Frame
using two Bolts [10] on each side of the U-Handle. Add Washer (14) and
secure the Bolts with Nuts [13] provided.
2. Position the Left Frame [7] inside the left groove of the Axle & Frame,
opposite the end with the U-Handle attached. Secure the Left Frame using
two Nuts and Bolts as shown in the diagram. Repeat for the Right Frame [8].
3. Attach the Bracket [9] to the Left and Right Frame pieces using the
remaining Nuts and Bolts. Be sure that the folded edge of the Bracket points
in toward the U-Handle.
4. To attach the Wheels [3], slide one of the Bushing [5] pieces over the Axle
[11], followed by one of the Wheels. Secure the Wheel using a Washer [2]
and Cotter Pin [6]. Repeat for the other Wheel.
5. Insert Caps [12] into the open ends of the tubing in the U-Handle, and the
Left and Right Frame pieces.
REV 12/03