


Special offers from our partners!

Find Replacement BBQ Parts for 20,308 Models. Repair your BBQ today.

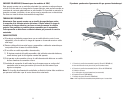
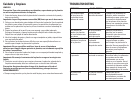
4
3
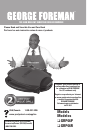
Product may vary slightly from what is illustrated.
† 1.
Grill plate (upper) (Part # GRP46R-01)
2. Grill plate release handles (both sides)
† 3. Grill plate (lower) (Part # GRP46R-02)
4. Power cord
5. Preheat indicator light (not shown)
† 6. Spatula (Part # GRP46R-03)
† 7 Drip tray (Part # GRP46R-04)
Note: † indicates consumer replaceable/removable parts
How to use:
This product is for household use only.
GETTING STARTED
• Remove all packing material and any stickers.
• Remove and save literature.
• Wash removable parts as instructed in CARE AND CLEANING section of this
manual.
• Wipe grill plates with a damp cloth or sponge to remove any dust. Wipe dry
with a soft cloth or paper towels.
• Select location where unit is to be used, leaving enough space between back
of unit and wall to allow heat to flow without damage to cabinets and walls.
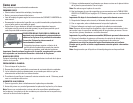
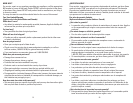
ATTACHING THE GRILL PLATES (B)
Important: This appliance should always be used
with 2 grill plates securely attached.
Caution: Attach grill plates when the appliance is
cool.
1. Securely attach the top and bottom grill plates of
the appliance using the release handles on each
side of the plates.
Important: When attaching the grill plates, be sure they are securely attached
using the release handles on each side of the plates.
DRIP TRAY
Place the drip tray under the front sloped section of the bottom plate on the grill.
PREHEATING THE GRILL
1. Close cover on grill.
2. Unwind cord and plug into standard electrical outlet.
3. The preheat indicator light comes on to indicate that the elements are heating.
4. Allow the grill to preheat for at least 5 minutes before grilling. If desired, use a
kitchen timer.
GRILLING
1. Using a pot holder, carefully open the preheated grill.
2. Before first use, lightly oil grill plates, if desired.
Note: Aerosol cooking spray should not be used on nonstick surface. Chemicals
that allow spray to come out of can build up on surface of grill plates and reduce
their efficiency.
3. Carefully place foods to be cooked on lower grilling plate. Close lid.
Note: Do not overload grill.
4. Use suggested cooking times found in the GRILLING CHART on page 6.
If desired, use a kitchen timer.
B
A