


Special offers from our partners!

Find Replacement BBQ Parts for 20,308 Models. Repair your BBQ today.

1510
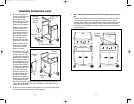
13. Each Side Shelf has a support leg at the front and a support brace at the
back. Position the left Side Shelf above the left Side Panel. Lower the Side
Shelf and insert the support leg into the opening on the top-front of the left
Side Panel. Align the mounting holes in the support leg and brace with the
mounting holes in the Side Panel and securely fastened with Long Bolts
Lock Washers, and Flat Washers. Repeat this procedure with the Right Side
Shelf w/Burner. Tighten all screws from Grill and Lid Assembly.
14. Attach one of the Cruet Shelves to the left Side Shelf. This is accomplished
by aligning the notch in the end of the shelf over the support rod located at
the left side of the control panel. Rotate the Cruet Shelf up, sliding its top
edge behind the front edge of the Side Shelf. Secure with Long Bolts, Lock
Washers and Flat Washers. Repeat this procedure to attach the other Cruet
Shelf to the Side Shelf w/Burner.
Side Shelf
w/Burner
Side Shelf
Cruet Shelf
Support Leg
Side Shelf
w/Burner
Cover
Support Leg
and Support
Brace
Mounting Holes
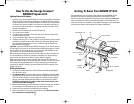
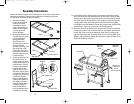
Assembly Instructions
Remove all contents from the carton and make sure all parts are present before
attempting to assemble. Tighten all bolt connections by hand first, then when
the grill is fully assembled, go back and tighten.
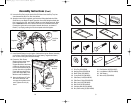
1. Attach the Lockable
Casters to the left Side
Panel by turning the
threaded end of each
caster into the holes as
shown. Securely tighten
using the open-end
wrench provided.
2. Attach each Wheel to the
right Side Panel by insert-
ing a Shoulder Bolt
through the Wheel,
Wheel Spacer and
mounting hole, as shown.
Secure the Wheel
Assembly to the leg of the
Side Panel with a Self
Locking Nut. Use one of
the wrenches to hold the
bolt while tightening the
nut with the other.
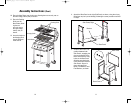
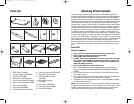
3. Attach the Base Panel to
the left Side Panel, as
shown, using three of the
Long Bolts (two may be in
panel already). Thread a
Long Bolt into the upper
mounting hole on the
inside of the front of the
Side Panel, leaving about
1/4". Hook the Base Panel
brackets over the head of
each Bolt as shown in
Detail A. Slide the Base
Panel forward (Detail A),
then down, as shown in
Detail B. Partially tighten
each Bolt, keeping in
mind that they will be
securely tightened at the
completion of assembly.
Side Panel, Left
Caster
Side Panel, Right
Shoulder
Bolt
Wheel
Wheel Spacer
Nut
Detail A Detail B
Base Panel
Bracket
Side Frame, Left
GR-GBQ440_IB_1-4-04 4/1/04 3:28 PM Page 19