


Special offers from our partners!

Find Replacement BBQ Parts for 20,308 Models. Repair your BBQ today.

Installation
Outdoor Cooki_g (enters
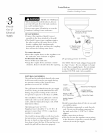
ELECTRICAL SUPPLY
Models with rotisserie require 120V, 60Hz.
and cmmected to an individual properly
grounded branch circuit protected by a 15
amp circuit breaker or time delay filse.
The power cord on the rotisserie is equipped
with a three-prong (grotmding) plug which
mates with a standard three-prong grotmding
wall receptacle to minimize the possibility of
shock hazard fi_om this appliance.
If the electrical service provided does not
meet the above specifications, it is recom-
mended that a licensed electrician install an
approved outlet.
DO NOT UNDER ANY CIRCUMSTAN(:ES,
CUT OR REMOVE THE THIRD (GROUND)
PRONG FROM THE POWER CORD.
• For 27" wide built-in grills, locate the
electrical outlet on the left hand side within
reach of the rotisserie's 72" power cord.
• For 36" and 48" wide built-in grills, locate
the electrical outlet on the right hand side
within reach of the rotisserie's 30" power
cord.
St
es[Jo "
Leaks
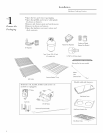
TEST FOR LEAKS
A complete gas tightness check must be
pertormed at the installation site.
• Do not use the grill tmtil all com_ections have
been leak tested.
• Repeat leak test alter each LP tank change.
• Check to be sm'e the main valve on the LP
tank or the shut-off valve is in the "OFF"
position.
• Make a soap solution of one part liquid
detergent and one part water.
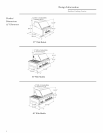
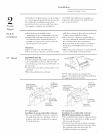
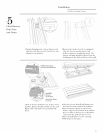
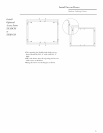
The valve panel must be removed to check the
valves and fittings.
• All control valves should be in the "OFF"
position.
• Relnove the knobs.
• On inodels equipped with Rotisserie, relnove
the satety valve pushbutton and tmsrrew the
stn'rotmding bezel.
• Rem()ve the 4 screws holding the valve panel
to the grill.
• Pull the panel outwards and m_plug the wires
fl'om the back of the rotaI T igniters.
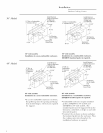
• If the grill has an optional rotisserie bm'ner,
remove the screws holding the inspection
cover in place.
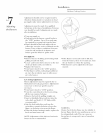
TO TEST:
• Apply the soap solution arotmd the
com_ections, valve and tubing.
• Tm'n the gas supply on.
• Check all comaections fi'om the supply line
or LP tank up to and including the manifl_ld
pipe assemblv.
• If a leak is detected, turn gas supply to off
and tighten fittings. Tm'n the gas on and
check again.
• To re-install the valve panel, re-comaect the
igniter wires and secm'e the panel with
original screws.
10