


Special offers from our partners!

Find Replacement BBQ Parts for 20,308 Models. Repair your BBQ today.

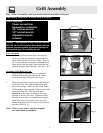
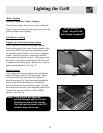
Grill Assembly
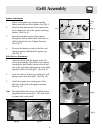
Ignitor Attachment
1. Remove the ignitor cap, spring assembly,
battery and lock nut from ignitor. (See Fig. 5)
2. Insert the threaded section of the ignitor into
the U-shaped cut out of the ignitor mounting
bracket. (See Fig. 6)
3. Insert the threaded section of the ignitor
through the hole in either shelf and secure to
shelf using the lock nut. Tighten Securely.
(See Fig. 7)
4. Re-insert the battery, positive side first, and
spring assembly and attach the ignitor cap.
(See Fig. 8)
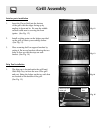
Side Shelves
Attachment
1. Attach the shelf with the ignitor to the left
side of grill and the other shelf to the right by
inserting the shelf hooks into the slots on the
side of the grill and pushing down on the shelf
assembly until level with grill. (See Fig. 9)
2. Lock the shelves in place by inserting (2) self
taping screws into each shelf. (See Fig. 10)
3. Attach the ignitor wire coming out of the
left side of the grill to the ignitor terminal.
(See Fig. 11)
Note: The right shelf needs to have the black plastic
plug inserted the cutout hole. This will create
a cleaner look to the shelf.
6
Fig. 5
Fig. 6
Fig. 8
Fig. 7
Cap
Battery
Mounting
Bracket
Cylinder
Locking
Nut
Spring
Assembly
Fig. 9
Fig. 10 Fig. 11
Cap
Locking
Nut
Ignitor
Wire