


Special offers from our partners!

Find Replacement BBQ Parts for 20,308 Models. Repair your BBQ today.

25
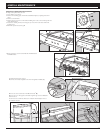
HELPFUL HINTS
HELPFUL HINTS
PROBLEM CHECK and CURE IMPORTANT
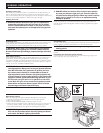
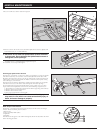
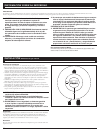
ELECTRONIC IGNITION
Be sure you have a fresh battery installed.
Be sure that there is gas fl ow to the burners by attempting to match light your burners. If match
lighting is successful, the problem lies somewhere in the ignition system and will need to be
checked.
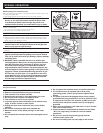
• Check that all wires are connected to the ignition box (1).
• Be sure that wires are correctly inserted into terminals (2) on ignition box.
Verify that the battery is in good condition
and installed correctly.
If for any reason the igniter system is still
inoperative, follow match lighting instructions.
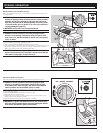
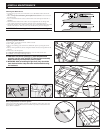
MAIN GRILLING BURNERS
ƽ CAUTION: Always turn the gas supply off at the source before
proceeding with any troubleshooting procedures.
ƽ WARNING: The hood must be in the full open position any time you
attempt to light your grill. Failure to open the hood could lead to
delayed ignition, resulting in bodily harm.
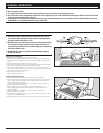
After shutting off the main gas supply, remove the cook grate and heat distribution plates. Push
the igniter button and check if the electrode is sparking to the igniter tube. Try pushing and
holding the igniter so that it clicks several times.
If the main burner(s) still fails to ignite, make
sure that there is gas fl owing to the burner(s)
by attempting to match light the burner(s).
If the burners will match light, then proceed
with the ignition checkout.
If for any reason the igniter system is still
inoperative, follow match lighting instructions.
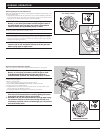
BURNERS WITH POOR FLAME
Check to be sure burner ports, shutter, end of the burner (venturi) and orifi ce(s) are free of any
obstructions. Also, if your grill has been stored over a prolonged period of time, check to make
sure no spiderwebs have been formed in the shutter end of the burner (venturi) or over orifi ces.
If you still have a poor fl ame, please contact
dealer for futher assistance or call Customer
Service at 1-800-382-2637.
If problems cannot be corrected by using these methods, please contact the Customer Service Representative in your area by calling 1-800-382-2637.
TROUBLESHOOTING
TROUBLESHOOTING
3. It is important to evenly balance the meat on the spit rod. Proper balancing will
lead to more even cooking and prolong the life of the rotisserie motor.
4. Pliers may be used to tighten thumb screws on meat forks when larger cuts of
meat are being cooked.
5. Use twine to secure the meat on the spit rod, especially fowl or other cuts of meat
that require tying.
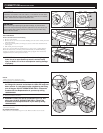
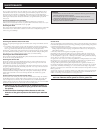
Rotisserie Bracket (Motor Bracket Side)
When mounting the spit rod motor onto the motor bracket (right side burner box), the
ears of the motor bracket must be fully inserted into the spit motor slots.
Accomplish this by sliding the spit motor down to the stops of the spit motor bracket.
The spit rod should not be making surface contact with the slot in the spit motor
bracket. See Assembly Guide for more information.
Side Tables
Do not use side table(s) as a cutting board. Clean with soap and water.
Moving Portable Grills
When your grill is not in use and you wish to relocate it, we recommend you push the
grill by the side shelf.
ƽ CAUTION: When moving grill, make sure you turn the
appliance control knobs to “OFF” first, and then the gas
supply at source.
Storing Natural Gas Grills
After you have fi nished cooking and have cleaned your grill, (see Maintenance
section – for cleaning), turn your grill off at your appliance control knob. It is strongly
recommended that the inline fi eld installed cutoff valve also be turned off when the
grill is not in use.
When the portable grill is to be stored indoors, the connection between the hose and
the gas supply line must be broken. While the special fi tting will stop the gas fl ow when
the hose connection is removed, it is highly recommended you turn the gas supply off
prior to disconnecting the hose assembly. To protect the gas fi tting, it is necessary to
insert the plastic plug (supplied with 10’ hose package) into the female quick connect.
The male end of the hose must be protected by placing the plastic cap (supplied with
10’ hose package) over the brass fi tting on the end of the hose.
Gas Valve Orifi ce
ƽ WARNING: Any alteration made to the orifice(s) such as
drilling it out, will void your warranty and may result in
serious bodily injury or death, or in a fire or an explosion
causing damage to property.