


Special offers from our partners!

Find Replacement BBQ Parts for 20,308 Models. Repair your BBQ today.

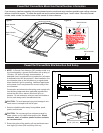
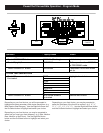
combustible material or surfaces before cooking. Refer to
Figure 3 for dimensions of the electric grill.
3. Ensure that there are no ammable or other volatile
materials in the direct area before grilling.
4. For ease of electrical hook up you may wish to locate the
electric grill near an existing outlet. (Refer to NOTE
above)
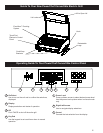
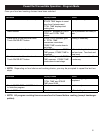
5. Stand the electric grill on its back.
6. Loosen but do not remove the two (2) knobs on either
side of the grill. (Figure 4)
7. Pull out both support legs until the rst stop tab is reached
(Figure 4-i). Tilt the support legs outward as shown in
Figure 4-ii to clear the stop tab and fully extend both
support legs as indicated in Figure 5.
8. Move the support legs inward so that they are ush
against the chassis and re-tighten the knobs to secure
support legs in place. (Figure 5)
CAUTION: To maximize air ow under the grill and to
prevent unnecessary wear to grill components, ensure
support legs are fully extended before use.
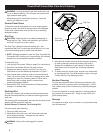
9. Place grill on its feet and unwind the attached power cord
from underneath the front edge. Route power cord to a
power source. (See NOTE above)
WARNING: Ensure the power cord is not pinched or
against a sharp edge. Ensure that the power cord is
stored or secured to avoid tripping or snagging to reduce
the risk of re, electric shock or injury to persons.
Never route power cord underneath the electric grill.
Always route power cord directly out the side or front.
3
PowerChef Convertible Site Selection And Setup
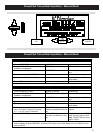
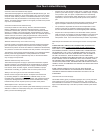
10. Unlock top lid by pressing each of the two (2) lid locks
inward, and sliding them towards the front, inside corners
of the lid. (Figure 6) To lock the lid in place for storage or
transporting, close the lid, press the locks inward and
slide them towards the rear of the grill lid.
!
NOTE: Once grill rests on fully extended legs, it will be
possible to slightly rock the grill forward and back. This is
normal and is due to the clearances required for moving
parts within.
Figure 4
Knob
Figure 5
i)
ii)
Legs Fully Extended
Figure 6
Locked
Unlocked
Locking
Switch