Special offers from our partners!

Find Replacement BBQ Parts for 20,308 Models. Repair your BBQ today.

www.desatech.com
122274-01F 29
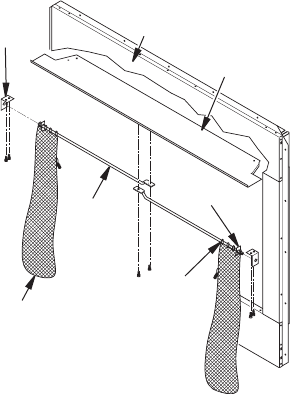
Figure 18 - Installing Fireplace Screen
Ring
Screen
INSTALLATION
Continued
Push
On Nut
Screen
Rod
Bracket
Smoke Shelf
Screen
Rod
Fireplace Front
3. Slide round end of screen rod into rings
at top of screen. Attach one push-on nut
to end of rod before attaching last ring of
screen.
4. Insert round end of rod into rod bracket
on left side of replace.
5. Mount at end of screen rod with #10 x 5/8"
to center of smoke shelf (see Figure 18).
6. Install other screen rod in same manner.
TECHNICAL SERVICE
You may have further questions about installa-
tion, operation, or troubleshooting. If so, con-
tact DESA Heating, LLC at 1-866-672-6040.
When calling, please have your model and
serial numbers of your rebox ready.
You can also visit DESA Heating, LLC’s web
site at .
REPLACEMENT PARTS
Note: Use only original replacement parts.
This will protect your warranty coverage for
parts replaced under warranty.
PARTS UNDER WARRANTY
Contact authorized dealers of this product. If
they can’t supply original replacement part(s),
call DESA Heating, LLC at 1-866-672-6040.
When calling DESA Heating, LLC, have
ready
• your name
• your address
• model and serial numbers of your rebox
• how rebox was malfunctioning
• type of gas used (propane/LP or natural
gas)
• purchase date
Usually, we will ask you to return the part to
the factory.
PARTS NOT UNDER WARRANTY
Contact authorized dealers of this product. If
they can’t supply original replacement part(s),
call DESA Heating, LLC at 1-866-672-6040 for
referral information. A list of authorized dealers
can be found by visiting .
When calling DESA Heating, LLC, have
ready
• model number of your rebox
• the replacement part number


