


Special offers from our partners!

Find Replacement BBQ Parts for 20,308 Models. Repair your BBQ today.

8
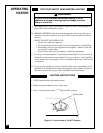
Placing Heater On Mounting Screws
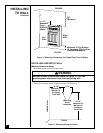
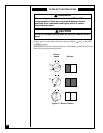
1. Locate two keyhole slots on back panel of heater (see Figure 7).
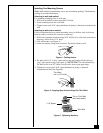
2. Place large openings of slots over screwheads. Slide heater down until screws
are in small portion of slots.
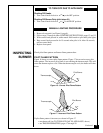
Figure 9 - Installing Bottom Mounting Screw
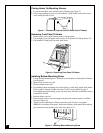
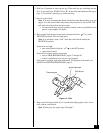
Removing Front Panel Of Heater
1. Remove two screws near bottom corners of front panel.
2. Lift straight up on grill guard until it stops. Grill guard will slide up about 1/4".
3. Pull bottom of front panel forward, then down.
Figure 8 - Removing Front Panel Of Heater
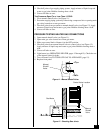
Installing Bottom Mounting Screw
1. Locate bottom mounting hole. This hole is near bottom on back panel of heater
(see Figure 9).
2. Mark screw location on wall.
3. Remove heater from wall.
4. If installing bottom mounting screw into hollow or solid wall, install wall anchor.
Follow steps 1 through 5 under Attaching To Wall Anchor Method, page 7.
If installing bottom mounting screw into wall stud, drill hole at marked location
using 9/64" drill bit.
5. Replace heater on wall.
6. Insert bottom anchor screw through back panel into bottom anchor or drilled
hole (see Figure 9).
7. Tighten screw until heater is firmly secured to wall. Do not over tighten.
Note:
Do not replace front panel at this time. Replace front panel after making
gas connections and checking for leaks (see pages 9-11).
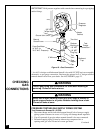
Figure 7 - Location Of Keyhole Slots On Back Panel Of Heater
Keyhole
Slots