


Special offers from our partners!

Find Replacement BBQ Parts for 20,308 Models. Repair your BBQ today.

Page 21
GRILL MAINTENANCE CONT...
BURN POT
The proper seating of the burn pot is crucial to proper grill performance. The Burn Pot placement should be
checked after every burn or after the grill has been moved. Because the burn pot is used to channel the fan forced air
into the burn grate, there is very little maintenance to be done in this area. Occasionally you may either vacuum or brush
out any build-up of ash or burn debris that has fallen below the burn grate. Before replacing the burn pot always clean
any debris from around or under the burn pot seating. It is crucial that the burn pot is seated tight to the side wall
and that it is tight to the barrel bottom.
STAINLESS STEEL BURN GRATE
Periodically check the air holes found in the sides and bottom of the burn grate for any blockages or build-ups.
Using a wire brush or flat-head screwdriver, scrape off any build up or blockage. When reinstalling the grate also confirm
the proper positioning in the burn pot. The grate should be level from side to side and from front to back as well as
should have a snug but not tight fit. The grate should not be blocking the two igniter holes.
IGNITER
The 300 watt electric igniter needs very little maintenance. Do check to confirm that the two air holes are free of debris or
blockage. As well confirm that the igniter is setting level in the burn grate.
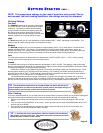
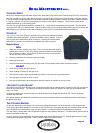
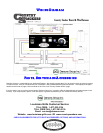
FAN COOLED HOPPER ASSEMBLY
BE SURE TO UNPLUG YOUR GRILL BEFORE PERFORMING ANY SERVICE.
There are a number of very quick checks that should be performed on the outside of the hopper assembly.
1. Check and clean any debris from the fan air intake. E.g. Spider webs, tree fluff, etc.
2. Check and clean any debris from the air vent exhaust found at the top of the hopper.
3. Inspect and clean the fuel hopper area. The galvanized metal can be wiped down using warm water and detergent.
To aid in protecting the metal and to allow the pellet fuel to slide easily, you can apply a coating of car wax .
4. Inspect the rubber “Paddle Wheel” feed wheel. Check for any tears or wearing of the wheel.
You can remove the 6 (six) Phillip screws securing the side panel to the hopper assembly. 2 on the front, 2 on the back
side and 2 on the under side. This will allow you to perform the following within the hopper assembly:
1. Check and clean any debris within the hopper housing.
2. Check and clean any debris from the fan blades or housing.
3. Check and clean any debris from the feed wheel motor.
4. Visual inspection on the wire harness and all wire connections.
Upon inspection replace all 6 Phillip screws. Hand start each screw to ensure proper threading.
GREASE CATCH AREA AND CAN
Always be sure the grease catch area is clean and free of debris. We recommend the use of your favorite beverage can
as the grease collector for the following reasons:
1. Clean and easy disposal.
2. The upper lip of the can contains the grease drippings.
3. The can be replaced more frequently.
4. Can be replaced easily with another can while the grill is operating.
5. Note: The can and grease will be hot. Use protection when replacing while hot.
During the warmer months empty any grease build-up on a more frequent basis to avoid it from going rancid and to avoid
having any extra creatures enjoying your grill.
Slowing Down . . . Not Putting Away for the Season
We recommend that at least once a month, while your grill is cold, that you should perform not only the above
maintenance procedures, but also include the following:
Using a stiff vegetable brush knock-off any built-up scale on the inside walls of your grill. Check the inside of the lid, the
smoke deflector, and the inside walls of the cooking area.
Using an old paintbrush, brush off any ash build-up found inside the firebox, grate, and flame deflector areas.
Finally give your entire grill a good cleaning with a shop vac when cool to the touch, a quick wash and rinse and apply any
touch up paint.