


Special offers from our partners!

Find Replacement BBQ Parts for 20,308 Models. Repair your BBQ today.

17
If the second or third attempt to ignite the burner is 6.
not successful then turn all burner controls to the OFF
position.
If the grill or cooktop fails to operate properly, make 7.
sure that power to the electrical outlet and gas supply
are turned on and that all installation steps have been
carefully followed. Check also for a tripped ground
fault interrupter on the electrical outlet. Push in on the
RESET button.
NOTE: If using an extension cord, the igniters will
not spark properly if the cord is not supplying a solid
ground.
If the grill still will not light, close the gas shut-off valve. Do
not attempt to repair the appliance yourself. Contact Dacor
Distinctive Service at (877) 337-3226. Have the model and
serial number from the product data label available when
you call.
Dacor is not responsible for the cost of correcting problems
caused by a faulty installation.
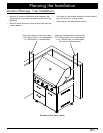
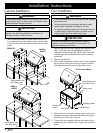
Installation Checklist
WARNING
To ensure a safe and proper installation, the follow-•
ing checklist should be completed by the installer to
ensure that no part of the installation has been over-
looked.
Proper installation is the responsibility of the hom-•
eowner. The importance of proper installation of your
Dacor Outdoor Grill cannot be over emphasized.
Is the electrical outlet for the appliance grounded and
□
located according to these instructions and in accor-
dance with all applicable electrical codes for outdoor
appliances?.
Is the gas service for the appliance located and
□
installed according to these instructions and in accor-
dance with all applicable codes?
Has the gas supply inlet pressure been measured to
□
ensure that it does not exceed the maximums and
meets the minimum stated in these instructions?
Is the appliance secured to the cabinet or cart?
□
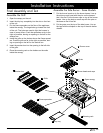
Are the grease tray, flame spreaders, grates and, if □
applicable, burner heads and caps properly installed
according to these instructions?
Has proper operation been verified? Did the installer
□
check the gas supply for leaks?
Have any problems been noted on the warranty card
□
or during the on-line warranty activation? Has the war-
ranty been activated on-line or the warranty card filled
out completely and mailed?
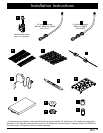
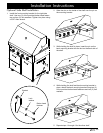
With the tank shelf open, connect the power cord from 2.
the outdoor grill and the warming oven (if equipped with
one) to the electrical outlet on the back panel inside the
cart.
Connect the rotisserie motor power cord to the electri-3.
cal outlet on the back side of the cart.
Power Connection - Cabinet Installations
Connect the appliance(s) to an electrical outlet •
that meets the specifications in the Planning the
Installation section.
The rotisserie motor should be plugged into the same •
outlet or an alternate 120 Vac outlet on the same circuit
as the appliance.
Verifying Proper Operation
Lighting Instructions
Read and understand the accompanying use and care 1.
manual prior to cooking with this appliance. The use
and care manual contains additional important safety,
service and warranty information.
No adjustment of burner settings is required. All valves 2.
and air mixture shutters found in this appliance have
been factory preset.
With the gas shut-off valve open, turn all 3.
burner knobs to the HIGH position for
approximately 20 seconds to allow the air
in the system to purge from the grill and
cooktop side burners.
Once the gas has filled the lines the auto-4.
matic electronic ignition system should
ignite the burner. If the system burners
do not ignite within 20 seconds turn all
burner controls to the OFF position. Wait
five minutes and attempt the ignition pro-
cess again.
Visually check the burner flame for proper operation. 5.
Proper flame operation will show a steady, soft blue
color and stable flame.
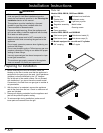
Installation Instructions
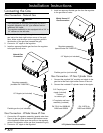
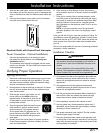
Electrical Outlet with Ground Fault Interrupter
OFF
HIGH