Special offers from our partners!

Find Replacement BBQ Parts for 20,308 Models. Repair your BBQ today.
5
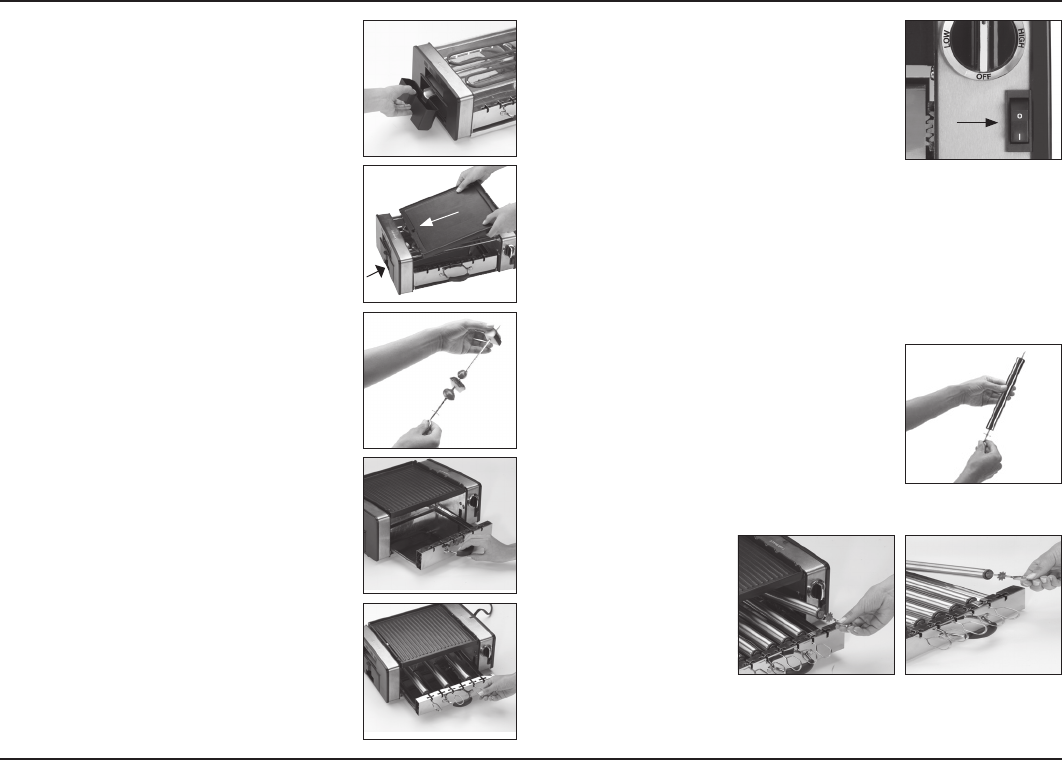
4. Carefully slide out the drip cup by pressing
down on the tab, and gently pull out the
cup to dispose of its contents (see figure
H). Clean cup and replace in base. (See
Cleaning and Care, page 6.)
5. Thoroughly clean grill/griddle plate. (See
Cleaning and Care.)
6. Flip the plate over, and return to base.
7.
Make sure that drip hole in plate lines up over
drip cup (see figure I).
8. Reconnect the plug into a standard
electrical outlet.
Using the kebab feature
1. Assemble the unit with the grill/griddle
plate, kebab drawer, and drip cup in their
proper positions. Note: Grill/griddle plate
must be on unit when using kebab feature.
Please keep in mind that it is very hot when
the unit is operating.
2. Turn the temperature control dial to desired
temperature and preheat for approximately
8 to 10 minutes.
3. Prepare food according to your favorite
kebab recipe and slide pieces onto
skewers. (See figure J).
4. Pull drawer to open. Position skewers in the
skewer slots so the star-like shape at the
end of each handle is inserted into a gear
slot in the front end of the kebab drawer.
Close drawer securely. (See figures K and L).
Note: If using large cubes of meat or
seafood, you may be limited to the number
of kebabs you can cook at once.
5. Press the kebab control switch to ON. The
switch light will illuminate to let you know
kebabs are rotating.
6. To check to see if kebabs are cooked,
press the kebab control switch to stop
skewers from turning and remove a kebab
with a potholder. If more time is needed
replace the skewer and press the kebab
control switch to resume cooking.
Using the hot dog feature
1. Assemble the unit with the grill/griddle plate, kebab drawer, and
drip cup in proper positions. Note: The grill/griddle plate must be
on unit when using hot dog feature. Please keep in mind that it is
very hot when the unit is operating.
2. Turn the temperature control dial to desired temperature and
preheat for approximately 8 to 10 minutes.
3. Assemble the hot dog rollers by slipping the
kebab skewers through the holes in each
end of the hot dog roller caps (See figure M).
4. Pull drawer to open. Position skewers with
hot dog rollers in the skewer slots so the
star-like shape at the end of each handle
is inserted into a gear slot in the front end
of the kebab drawer. (See figures N and O).
5. Using tongs,
position the hot
dogs in between
two of the hot dog
rollers. Five hot
dogs will fit six hot
dog rollers. Close
drawer securely.
H.
I.
J.
K.
L.
M.
O.N.


