


Special offers from our partners!

Find Replacement BBQ Parts for 20,308 Models. Repair your BBQ today.

Contents
Introduction 2
General Safety Information 2
Assembly 2 - 4
Instructions for Use 4 - 5
Notes 6
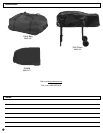
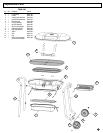
Replacement Parts 7
Warranty 8
2
Assembly
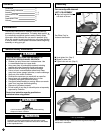
DANGER
WARNING
FOLLOW INSTRUCTIONS AND WARNINGS TO
AVOID FIRE, SERIOUS INJURY OR DEATH.
•Outdoor use only. Never use in enclosed area. Use
in unventilated areas can cause death.
•Keep away from all combustible materials including
gasoline and other flammable liquids and vapors.
• Read & follow all warnings on charcoal package.
• Use on a level, noncombustible surface only. Keep
away from house, garage, balconies, or eave overhangs.
• Keep out of the reach of children.
•Exercise the same care you would with an open fire.
• Never leave unit unattended when hot or in use.
•Completely extinguish fire before leaving.
• Use gloves when handling or moving. Ashes can remain
warm for a long time after extinguishing.
• Dispose of cold ashes properly.
• Do not modify in any way or use with parts not expressly
approved by Coleman.
Contact local authorities regarding possible burn
restrictions before using product.
Combustion by-products produced when using this product contain
chemicals known to the State of California to cause cancer, birth defects,
or other reproductive harm.
Follow these instructions for assembly and read carefully,
particularly the safety statements. The safety alert symbol,
is a universally recognized symbol used to identify safety
information about hazards that can result in personal injury.
When this symbol is used you should pay very close attention
to what is written. Review these instructions before beginning
assembly or using your grill.
Introduction
• BURN HAZARD
• Unit is hot when being used. Use care when servicing.
• Keep out of reach of children.
WARNING
General Safety Information
For use only with charcoal.
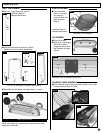
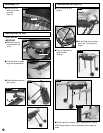
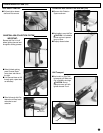
LEFT LEG ASSEMBLY
■ Align Left Leg with Bracket
and attach as shown.
Left Leg
Base
L-1
L-3
L-4
L-5
NOTE: After Left Leg is assembled the Leg should have slight
resistance in movement.
■ Hand tighten Nut. (Step 2)
■ Repeat for other side.
■ Tighten bolts and nuts. (Step 3)
L-2
Step 1a
Step 2
Step 3
Left Leg Assembled
Bracket
See Blister Pack for
hardware identification.
Step 1