


Special offers from our partners!

Find Replacement BBQ Parts for 20,308 Models. Repair your BBQ today.

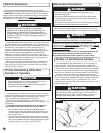
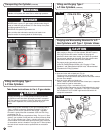
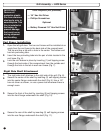
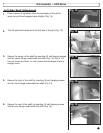
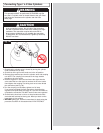
Cart Brace Installation
1.
Open the left grill door. The two cart braces will be installed at an
angle from the cart base to the back side of the compartment.
The top end has a tab with a hole in the center. The bottom end
has two protruding tabs.
2.
Insert the two protruding tabs into the pair of slots located in the
cart base (Fig. 6).
3.
Lock the cart braces in place by inserting (1) self tapping screw
through the back side of the compartment from the outside and
through the hole in the tab in each cart brace (Fig. 7).
Fig. 6
Fig. 7
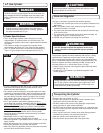
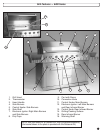
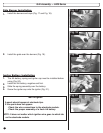
Grill Assembly — 8400 Series
IMPORTANT:
Remove all
protective plastic
film from stainless
steel parts prior to
assembly/use. This
film is installed at
the factory to
prevent damage
that could occur
during shipment
and handling.
Tools Required (not provided):
— 1/4” Hex Nut Driver
— Phillips Screwdriver
Optional:
— Battery Powered 1/4” Hex Nut Driver
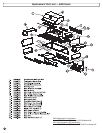
Fig. 9
Fig. 10
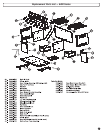
Fig. 11
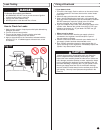
Fig. 8
1.
The right side shelf attaches to the right side of the grill (Fig. 8).
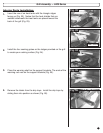
2.
Secure the center of the shelf by inserting (2) self-tapping screws
into the center flange underneath the shelf (Fig. 9). Use a 1/4”
hex nut driver as shown, or use a power tool whenever there is
enough room.
Right Side Shelf Attachment
3.
Secure the front of the shelf by inserting (2) self tapping screws
into the front flange underneath the shelf (Fig. 10).
4.
Secure the rear of the shelf by inserting (2) self tapping screws
into the rear flange underneath the shelf (Fig. 11).
10