


Special offers from our partners!

Find Replacement BBQ Parts for 20,308 Models. Repair your BBQ today.

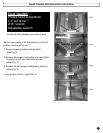
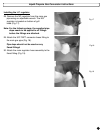
Fig 15
Control Knob
Stems
You are now ready to install
the new LP manifold.
16. NOTE: New screws for the bezels are inserted
into the new LP manifold at the factory. Remove
them before proceeding with Step 17.
17. Place the new manifold into the grill body with
the control knob stems going outward through
control panel front (Fig. 15).
18. Reattach the bezels to the manifold with the
screws. Make sure that "off" is facing up on the
bezel (Fig. 12 & 13).
19. Reattach the control knobs onto the manifold
stems, making sure the arrow is facing upwards
(Fig. 11).
20. Reattach the flexline on the left of the grill to the
back infrared valve using an adjustable wrench
(Fig. 10).
21. Reattach the flexline on the right of the grill to
the new manifold using the adjustable wrench
(Fig. 9).
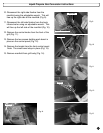
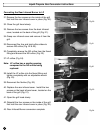
22. Reinstall burners into the grill body. Line up the
burners with the valves on the manifold, making
sure they are level. Make sure the burners are
fully over the valves (Fig. 16).
23. Reattach the igniters and their heat shields
(removed in Steps 2, 3, and 4) to the burners
(Fig. 2, 3, and 4).
24. Reattach the rear heat shields before attaching
the front heat shield to be sure the burners
remain over the valves (Fig. 2).
25. Reinstall the front heat shield (Fig. 5, 6, and 7).
26. Reinstall the heat tents (Fig. 1).
27. Reinstall the cooking grates.
Liquid Propane Gas Conversion Instructions
6
Fig 16
Valves
Burners