


Special offers from our partners!

Find Replacement BBQ Parts for 20,308 Models. Repair your BBQ today.

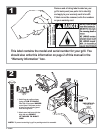
Ignitor Lighting
s
s
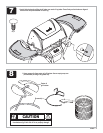
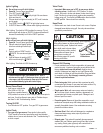
Do not lean over grill while lighting.
Open lid.
Do not lean over grill while lighting.
Open lid.
1. Turn on gas at gas source.
2. Turn LEFT knob to IGNITE.
3. Push IGNITOR Button rapidly to light. Be sure burner
lights and stays lit.
4. If burner does not light turn knob(s) to OFF, wait 5 minutes
and try again.
5. Turn RIGHT knob to IGNITE to light other burner.
6. If IGNITOR does not work, follow match lighting instructions.
After Lighting: Turn knob to HIGH position for warm-up. Do not
warm up grill with knobs on IGNITE. Knobs and handle will
become uncomfortably hot if left in IGNITE positions.
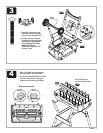
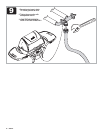
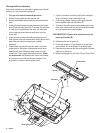
1. Turn on gas at gas source.
2. Place lit match into match lighting
hole from outside grill bottom (as
shown).
3. Push in and turn RIGHT knob to
IGNITE. Be sure burner lights and
stays lit.
4. Light left burner by pushing LEFT
knob in and turning to IGNITE.
After Lighting: Turn Knob to HIGH for warm-up.
Match Lighting
Match
lighting
hole is in
bottom
or side
CAUTION
• If burner does not light, turn knobs to OFF. Wait 5
minutes and try again. If the burner does not ignite with
valve open, gas will continue to flow out of the burner
and could accidently ignite with risk of injury.
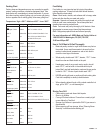
Burner Flame Check
Turning Grill Off
Ignitor Check
• Light burner, rotate knobs
from HIGH to LOW. You
should see a smaller flame in
LOW position than seen on HIGH. Always check flame prior to
each use. If only low flame is seen refer to "Sudden drop or
low flame" in the .
• Turn all knobs to OFF position. Turn gas OFF at gas source.
Press ignitor button rapidly.
"Click" should be heard and spark seen each time between
collector box or burner and electrode. See if
no click or spark.
Troubleshooting Section
"Troubleshooting"
• Turn gas off at gas source.
Valve Check
Hose Check
• Important: Make sure gas is OFF at gas source before
checking valves
LOW
OFF
•
. Knobs lock in OFF position. To check
valves, first push in knobs and release, knobs should spring
back. If knobs do not spring back, replace valve assembly
before using grill. Turn knobs to position then turn back
to position. Valves should turn smoothly.
Before each use, check to see if hose is cut or worn. Replace
damaged hoses before using grill. Use only valve and hose
specified by manufacturer.
HIGH
LOW
CAUTION
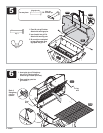
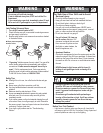
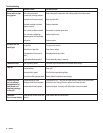
Clean burner prior to use after storing, at the beginning
of the grilling season or after a period of one
month not being used. Spiders and insects
like to build nests in burner tubes
(especially during colder months).
These nests can cause fires in
burner tubes or under grill.
See following pages for specific
cleaning instructions.
Typical spider webs
inside burner
General Grill Cleaning
• Do not mistake brown or black accumulation of grease and
smoke for paint. Interiors of gas grills are not painted at the
factory . Apply a strong
solution of detergent and water or use a grill cleaner with
scrub brush to insides of grill lid and bottom. Rinse and allow
to completely air dry.
Wash grate and drip vaporiser bar with
concentrated grill cleaner or use soap and water solution. Dry
thoroughly and store indoors between cookouts.
• ash with warm soapy water and wipe dry.
Do not use citrisol, abrasive cleaners, degreasers or a
concentrated grill cleaner on plastic parts. Damage to and
failure of parts can result.
Because of glass-like composition, most
residue can be wiped away with baking soda/water solution or
specially formulated cleaner. Use nonabrasive scouring
powder for stubborn stains.
Wash with mild detergent or nonabrasive
cleaner and warm soapy water, wipe dry with a soft
nonabrasive cloth
This grate will eventually decompose and
weaken with use. Remove grate from grill and tap to loosen
any scaling. Brush grate vigorously with a wire brush to
remove any additional scaling, rust or residue.
(and should never be painted)
Do not apply a caustic grill/oven
cleaner to painted surfaces.
• Plated wire grate:
Plastic parts: W
• Porcelain grate:
• Stainless Steel:
• Briquet grate:
s
4638220 • 13