


Special offers from our partners!

Find Replacement BBQ Parts for 20,308 Models. Repair your BBQ today.

5
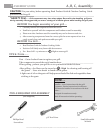
ASSEMBLY GUIDE
Part Qty
.
GRILL CART Assembly
A6
–
Cart Bracket
1
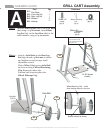
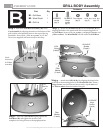
Step 3 - Carefully turn the Cart Assembly over
and allow it to rest on the tops of the leg
assemblies. Spread the leg assemblies apart just far
enough to allow the insertion of the Wire Shelf
(A7) into the 4 leg holes. Assemble the Cart
Bracket (A6) to the Cart Assembly by inserting 2
each 1/4-20x2" screws int0 into corresponding
holes as shown. Allow the Cart Bracket to rest on
the floor, this will help with alignment. Secure
with 2 each, 1/4-20 nuts using a small adjustable
wrench, not supplied. DO NOT TIGHTEN AT
THIS POINT. The bracket will be tightened in
step B2.
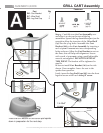
Be sure to install Cart Bracket (A6) on the side
shown. Once complete -leave the cart in the
upside down position.
Lastly, insert the Leg End Caps (A8) into the front
legs and secure with 1 each #10x3/8" screw.
A6
1/4-20x2"
screws
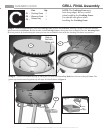
Place the Grill Bottom on the carton pad upside
down in preparation for the next step.
A7
1
Wire Shelf
–
A7
A8
#10x3/8"
screws
A8
–
Leg End Cap
2
Fasteners
1/4x20-2"
1/4-20 Nut
(qty 2)
screw
1/4-20 Nut
(qty 2)
#10x3/8"
(qty 2)
screw
A7
A6
Visit www.sizzleonthegrill.com/user-forums to chat with Patio Bistro® owners just like you!