


Special offers from our partners!

Find Replacement BBQ Parts for 20,308 Models. Repair your BBQ today.

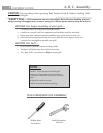
ASSEMBLY
6
ASSEMBLY GUIDE
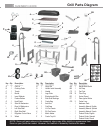
Part Qty
B3– Hinge, RH 1
B4– Hinge, LH 1
B7– Handle 1
Fasteners
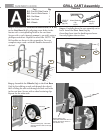
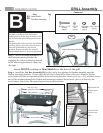
Step 3 - Attach the Hinges (LH and RH) (B4 & B3) to the
Firebox Bottom by aligning the screw holes on the bottom of
the grill with the corresponding holes in the hinges. Secure
with 2 each #10-24x5/8" screws, 2 fiber washers and 2 #10-24
nuts as shown.
(qty 8)
Fiber Washer
(qty 2)
Spacer for Lid
GRILL Assembly
LH side shown,
RH side similar.
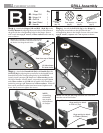
Step 4 - Attach the Grill Lid (B5) to the Hinges by
aligning the screw holes on the grill lid with the
corresponding holes in the hinges. Secure with 2 each #10-
24x5/8" screws, 1 spacer and 2 #10-24 nuts as shown.
B5
B7
B6
B2
B2
(qty 8)
10-24 Nut
B5– Grill Lid 1
(qty 12)
screw
10-24 x 5/8"
B6– Heat Shield 1
B4
B5
LH Hinge
NOTE: The LH hinge is mounted to the left side
of the firebox bottom as viewed from the rear of
the firebox. See Hinge Detail below.
NOTE: The LH and RH hinge locations are referenced
from the rear of the firebox.
NOTE:
Assembling
the handle
may require
the assistance
of a helper.
Step 5 - Attach the Heatshield (B6) and Handle (B7) the
Grill Lid (B5) by aligning the screw holes in the handle to and
heatshield with the corresponding holes in the Grill Lid.
Loosely install 1 10-24 x 5/8" Screw and 1 fiber washer on the
LH side of handle. Loosely install a second 10-24 x 5/8" Screw
and 1 fiber washer on the RH side of handle. Now install the
remaining 2 10-24 x 5/8" Screws and 2 fiber washers. When all
four screws and fibers washer have been started, tighten each
screw, but do not over tighten the screws.
B3 - RH Hinge
B4 - LH Hinge
View from rear of firebox
Hinge section to attach
to Grill Lid (Top)
Hinge section to attach
to Firebox (Bottom)
Hinge Detail