


Special offers from our partners!

Find Replacement BBQ Parts for 20,308 Models. Repair your BBQ today.

50004425
Operation
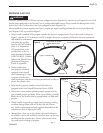
e rotisserie assembly includes a counterweight for large or irregular
foods; using the counterweight reduces strain on the motor which is rated
to turn a maximum of 12 lbs.
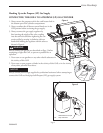
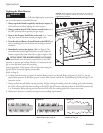
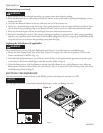
1. Attach the Rotisserie Motor Bracket to the left side of the base by
aligning the holes and securing the pieces together using the two (2)
bolts and two (2) lock nuts provided. (Fig. 12a)
For grill models with a marinating station: Loosen the two (2)
bolts and nuts securing the heat shield marinating tray to the grill
body. (Fig. 12b) Attach the rotisserie motor bracket using the
same mounting holes. Secure both the bracket and heat shield us-
ing bolts and nuts provided.
2. Remove the warming rack. Lay a flat noncombustible pan directly on
the cooking grates to catch drippings. Large food items may require
that you remove the middle cooking grate(s), and place the pan on
the sear plates. Never use the main burners while using the rotisserie
burner.
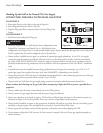
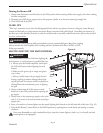
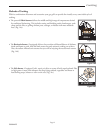
3. Insert the ends of the Rotisserie Support into the slots of the right
cooking grate, so the edge of the support is approximately 1” from the
right casting, and the top groove is in line with the rotisserie spit hole
in the left casting. (Fig. 12c)
4. Engage the Motor Bracket to the left side of the base as per Rotisserie
instructions.
5. Engage the Rotisserie Motor in the
Motor Bracket. (Fig. 12c)
6. Assemble the spit and meat forks.
Adjust the retainer bushing to keep the
spit in place. (Fig. 12c)
7. Tighten the thumbscrews with small
pliers.
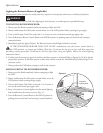
8. Insert the Spit Rod into the Rotisserie
Motor. (Fig. 12d)
Page 10
Spit Rod - Motor End
B132
Figure 12d
Rotisserie
Forks
Rotisserie
Motor
Bushing
Rotisserie
Support
B131
Figure 12c
Motor
Bracket
NOTICE
Rotisserie Motor Bracket
B163
Figure 12a
Heat Shield
Remove Bolts
and Nuts
B183
Figure 12b
View from behind
and under the side
shelf.