


Special offers from our partners!

Find Replacement BBQ Parts for 20,308 Models. Repair your BBQ today.

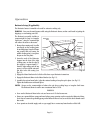
Control Functions
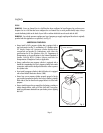
PROPANE TANK VALVE
WARNING: Never open the Tank Valve unless the Grill is being prepared for use, to prevent the pooling of
propane vapor.
Always open the Valve immediately before lighting the Grill, and always close it immediately after cooking has
been completed.
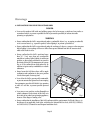
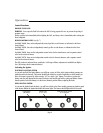
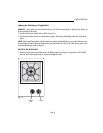
BURNER CONTROL VALVES (see Fig. 7)
On Model VM400, three valves independently control gas flow to each burner, as indicated on the front
Control Panel.
On Model VM450, four valves independently control gas flow to each burner, as indicated on the front
Control Panel.
On Model VM600, there are five independent control valves for the main burners, and a separate control
valve for the rotisserie burner.
On Model VM750, there are six independent control valves for the main burners, and a separate control
valve for the rotisserie burner.
The OFF position is indicated above each knob. A full range of flame adjustment is available from High to
Low, (by turning a knob counterclockwise).
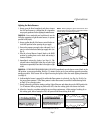
Activating the Igniter
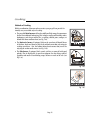
ELECTRONIC IGNITION SYSTEM
As you push and hold the Igniter Button, you will hear a series of clicks as the igniter module generates an
ignition spark to the burners. The burner should light within five seconds. Depending on which model you
have, the system is powered by either a single “AA” or a single “AAA” battery. To remove or replace the
battery, turn the push button knob counter-clockwise, and carefully pull out the spring and battery. Ensure
that the positive end of the battery is in the down (bottom) position before replacing the knob.
PIEZO IGNITION SYSTEM
As you turn the Igniter Knob clockwise, you will hear a click as the Piezo module generates an ignition spark
to the burner. Rotate the Igniter Knob until the burner lights. The burner should light within five seconds.
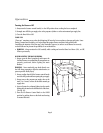
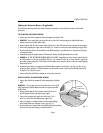
Operation
Page 6
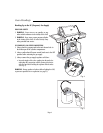
Fig. 7
Rotisserie Burner Control
(if so equipped)
Igniter Button
(All Models)
Main Burners
(3, 4, 5, or 6 )
(VM600 Model Shown)