Special offers from our partners!

Find Replacement BBQ Parts for 20,308 Models. Repair your BBQ today.

B101623-5-1012Page 44
General Overview
Broilmaster Infrared gas grills make it possible for you to enjoy
cooking outdoors quickly and effortlessly. In minutes, you can en-
joy steaks, hamburgers, poultry, pork chops, sh and other foods.
You can also cook more slowly if you wish. Broilmaster's optional
accessories are designed to enhance your grill's versatility.
Infrared Searing Method
Searing is a process that seals juices in food by cooking with in-
tense heat for a short period of time. The juices stay in the food
where they belong and the outside gets coated with avorful
smoke. For best results, follow these procedures when cooking.
Searing Method
1. Follow the Burner Ignition procedures and operate the grill for
5 minutes or until the burners glow uniformly.
2. Set the Burner Output Knob to HIGH and place the food on
the cooking grid for 1 - 2 minutes, or until food lifts without
sticking.
3. Turn the food and repeat Step 2.
4. Depending upon your taste, continue cooking on HIGH, turn-
ing the food frequently, or adjust the Burner Output Knob to
a setting between LOW and "medium" and continue cooking
until the food is cooked to your satisfaction. Turn as neces-
sary (generally every one to three minutes).
During the searing period, ashing might occur when juices va-
porize on contact with the cooking grid and burner surfaces. The
ashes and smoke greatly enhance the avor of food.
The intense infrared energy generated by your Broilmaster Grill has
other advantages. For example, food is evenly cooked throughout.
Also, upon contact with the cooking grids and burners, drippings
vaporize into avorful smoke that cooks back into the food.
Flare-Up Control
NOTICE: NEVER DOUSE A FLARE-UP WITH
LIQUID. IT WILL DAMAGE THE BURNER AND VOID THE WAR-
RANTY!
To minimize ame are-ups:
• Trim excess fat from meat.
• Reduce heat and reposition foods away from are-ups when
the occur.
• Prevent excess grease build up by periodically cleaning cook-
ing grids.
Helpful Hints
1. Use the proper tools. Long handled tongs, spatula, knife, and
mitts or a hot pad for handling hot items. When turning or
moving foods, use tongs or a spatula, instead of a fork. Pierc-
ing the food with a fork allows the natural juices and avor to
escape.
2. Monitor meat temperature. Bring large cuts of meat, roasts,
or fowl to room temperature before cooking. Smaller meat
cuts such as hamburgers, hot dogs, or small steaks may be
cooked directly from the refrigerator. Note: Broilmaster does
not recommend cooking portion meats from a frozen state.
3. Start slowly. Infrared grilling is unlike other outdoor cooking
methods. It may take time to get used to the fast cooking pro-
cess. As a benchmark, foods which generally cook in 20 min-
utes or less on conventional grills cook in about one-half the
conventional time on a Broilmaster infrared grill. Please refer
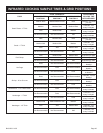
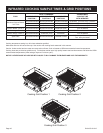
to the Infrared Cooking Sample Times on pages 43 and 44.
Indirect Cooking with a Broil-
master Infrared Grill
Indirect cooking is a slower process used to prepare large main
dishes - roasts, hams, turkeys, etc. Foods are placed on one side
of the grill and the other side is lighted to produce heat.
To protect the infrared burner from damage, place a heavy-du-
ty disposable aluminum pan over the burner to catch drippings.
Note: Make sure the aluminum pan is the same size or larger than
the infrared burner. Any liquids that land on the burner while it is
not burning may cause it to break when ignited.
The pan may be lled part-way with liquid (water, marinade, etc.)
to enhance the moisture content of the meat, but take special care
not to spill anything onto the burner when adding liquids or when
removing the pan after cooking.
INFRARED COOKING


