


Special offers from our partners!

Find Replacement BBQ Parts for 20,308 Models. Repair your BBQ today.

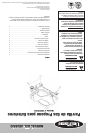
Outdoor LP Gas Barbecue Grill Model No. NBC1218G
Contact 1.800.762.1142 for assistance. Do not return to place of purchase.
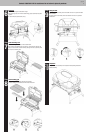
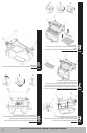
Step
1
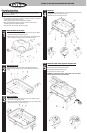
Attach lid handle and top hinges
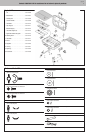
A. Attach lid handle to lid using 2 sets of heat resistant washers (H), large washers
(G), large lock washers (J) and large wing nuts (E).
B. Attach top hinges to lid using 2 sets of small screws (B), heat resistant washers
(H), small washers (F), small lock washers (I) and small wing nuts (D).
Step
2
Attach bottom hinges
Attach bottom hinges to bottom bowl using 4 sets of small screws (B), heat
resistant washers (H), small washers (F), small lock washers (I) and small wing
nuts (D).
Step
3
Attach side handles
A. Attach left side handle to bottom bowl using 2 sets of large washers (G), large
lock washers (J), and large wing nuts (E).
B. Attach right side handle with ignitor to bottom bowl using 2 sets of large washers
(G), large lock washers (J), and large wing nuts (E).
Step
4
Attach legs
Attach the legs to the bottom bowl using 4 sets of special screws (C), large washers
(G), large lock washers (J) and large wing nuts (E).
Note: Make sure rings on legs face front of grill.
Step
5
Attach heat shield, burner, regulator and ignitor wire
A. Attach heat shield and burner using wing bolt (A).
B. Pull ignitor wire through opening below regulator.
C. Screw regulator clockwise onto burner stem.
D. Insert ignition wire in bottom of ignitor.
WARNING: To avoid electrical shock, inspect before each use to make
sure the igniter and wire are fully connected.
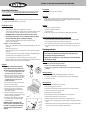
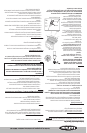
Assembly Instructions
DO NOT RETURN PRODUCT TO STORE.
For assistance call 1.800.762.1142 toll free. Please have your owner’s manual and serial
number available for reference.
For Easiest Assembly:
• To avoid losing any small components or hardware, assemble your product on a hard level
surface that does not have cracks or openings.
• Clear an area large enough to layout all components and hardware.
• When applicable, tighten all hardware connections by hand first. Once the step is
completed, go back and fully tighten all hardware.
• Follow all steps in order to properly assemble your product.