


Special offers from our partners!

Find Replacement BBQ Parts for 20,308 Models. Repair your BBQ today.

Outdoor LP Gas Barbecue Grill Model No. GBT1030 Series
Contact 1.800.762.1142 for assistance. Do not return to place of purchase.
Minimize Flare-ups:
Flare-ups are a part of cooking meats on a grill, and adds to the unique flavor of grilling.
Excessive flare-ups can over cook your food and cause a dangerous situation for you
and your grill.
Important: Excessive flare-ups result from the build-up of grease in the bottom of your grill.
1. Trim excess fat from meats prior to cooking.
2. Cook high fat contents meats on “LOW” setting or indirectly.
3. Ensure that your grill is on hard, level, non-combustible surface and the grease is allowed to
drain into grease cup.
Tips for Better Cookouts and Longer Grill Life
1. For food safety tips visit: http://www.fsis.usda.gov/Fact_Sheets/Barbecue_Food_Safety/
2. Use the upper cooking grid (warming rack) for keeping cooked food warm, toasting breads or
cooking delicate foods in aluminum foil pouches.
3. Use the side burner of this appliance like a normal kitchen range for boiling, sautéing or
frying.
4. To keep food from sticking to the grids, spray or coat with cooking oil before lighting.
5. To reduce flare-up keep grill clean, use lean cuts of meat (or trim fat) and avoid cooking on
very high temperatures.
6. Place delicate foods like fish and vegetables in aluminum foil pouches and indirect cook or
place on upper cooking levels (warming rack).
WARNING: Never cover entire cooking area with aluminum foil.
7. To avoid losing natural juices, use long handled tongs or spatulas instead of forks and turn
foods over just once during cooking.
8. Try water pans to reduce flare-ups and cook juicer meats. Before starting grill remove
cooking grids and place a heavy duty shallow pan directly on heat plates. Fill half way with
water, fruit juices or other flavored liquids. Replace cooking grids and position food over the
loaded pan.
9. Enhance food flavors by using wood chips in smoker boxes or aluminum foil pouches. Follow
the wood manufacturer’s instructions.
10. Grill baskets, vertical poultry holders and other accessories can enhance your experiences,
reduce cooking times and aid in clean-up.
11. Clean cooking grids and racks after every use with a quality grill bush designed for your
grid material. Wear protective gloves and gently remove the build-up while grids are hot.
12. After every use, allow grill to cool. Then protect clean cooking grids with a light coat of
cooking oil, empty grease pan, wipe outside surfaces with a suitable kitchen cleaner and
protect surfaces with a quality cover that properly fits your grill.
13. Watch barbecue themed TV shows or purchase related barbecue cookbooks to learn more
interesting tips like –
A gas grill is ideal for reheating leftover pizza. Set burners on low and place pizza slices
directly on preheated cooking grid. Close lid and cook until cheese starts to bubble.
Cleaning and Care
Caution:
1. All cleaning and maintenance should be done when grill is
completely cool (about 45 min.) and with the LP gas tank
disconnected.
2. DO NOT clean any grill part in a self cleaning oven. The extreme heat
will damage the finish.
Notices
1. Abrasive cleaners will damage this product.
2. Never use oven cleaner to clean any part of grill.
Cleaning Surfaces
1. Wipe surfaces clean with mild dishwashing detergent or baking soda.
2. For stubborn surfaces use a citrus based degreaser and a nylon scrubbing brush.
3. Rinse clean with water.
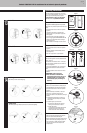
Cleaning Burner
1. Turn all control knobs to “OFF” and remove LP gas tank. Wait for grill to fully cool (about
45 min.).
2. Remove regulator knob and wind guard.
3. Remove cooking grids and heat plate.
4. Disconnect wire from igniter, if applicable.
5. Remove burner.
6. Remove all food residue and dirt on burner surface.
7. Clean inlet of burner with small bottle brush or compressed air.
8. Clean any clogged ports with a stiff wire (such as an opened paper clip)
9. Inspect burner for any damage (cracks or holes). If damage is found, replace with new burner
from manufacturer.
10. Reinstall burner. Reconnect igniter (if applicable), wind guard and regulator/control knob.
11. Replace heat plate and cooking grids.
12. Preform leak test.
Operating Instructions (continued)
Lighting
Caution: Keep outdoor gas cooking
appliance area clear and free from
combustible materials, gasoline and
other flammable vapors and liquids.
Caution: Do not obstruct the flow of
combustion and ventilation air.
Caution: Check and clean burner/
venturi tubes for insects and insect
nests. A clogged tube can lead to a
fire beneath the grill.
Caution: Attempting to light the
burner with the lid closed may cause
an explosion.
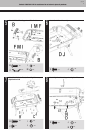
1. Make sure all labels, packaging and protective
films have been removed from the grill.
2. Open lid. Attempting to light the burner with
the lid closed may cause an explosion!
3. Make sure there are no obstructions of airflow to
the burners. Spiders and insects can nest within
and clog the burner / venturi tube at the orifice. A
clogged burner tube can lead to a fire beneath the
appliance.
4. All control knobs must be in the “OFF” position.
(Figure 2)
5. Select burner to light.
6. Turn the control knob to “HIGH”
7. Press the Igniter button repeatedly to light burner.
8. If ignition does not occur in 5 seconds, turn
control knob to “OFF”, wait 5 minutes and repeat
lighting procedure.
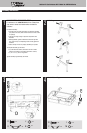
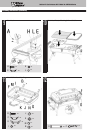
8. If igniter does not light burner, use a long lit
match to light burner manually. Access the burner
through the hole in bottom bowl as indicated.
(Figure 6a and 6b or 6c)
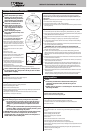
9. After lighting, observe the burner flame. Make
sure all burner ports are lit and flame height matches illustration. (Figure 7)
Caution: If burner flame goes out during operation, immediately turn
the control knob(s) “OFF” and open lid to let the gas clear for about 5
minutes before re-lighting.
Turning Off
1. All control knobs must be in the “OFF” position. (Figure 2)
2. Remove LP gas tank and properly store tank.
Cooking
1. Open lid and ignite burner(s) per “Lighting Instructions”.
2. Close lid and preheat grill on “HIGH”.
3. Adjust control to desired temperature.
4. Wearing protective gloves lift lid by handle(s) and use long handle tongs to place food onto
cooking grids above the lit burners.
5. With lid open or closed, cook until desired internal food temperatures are achieved.
6. Turn grill OFF per “Turning Off” instructions.
Controlling Flare-ups
Caution: Putting out grease fires by closing the lid is not possible.
• Do not use water on a grease fire. This can cause the grease to
splatter and could result in serious burns, bodily harm or other
damage. If a grease fire develops, turn regulator/control knob
“OFF”.
• Do not leave grill unattended while preheating or burning off food
residue on “HIGH”. If grill has not been regularly cleaned, a grease
fire can occur that may damage the product.
WARNING: When cooking, fire extinguishing materials shall be readily
accessible. In the event of an oil/grease fire, do not attempt to
extinguish with water. Use type BC dry chemical fire extinguisher or
smother with dirt, sand or baking soda.
Figure 6b
Match
Figure 6c
Match
Figure 7
1/2"
12,7 mm
6,4 mm
0 mm
1/4"
0"
Flame