


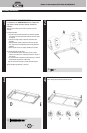


Special offers from our partners!

Find Replacement BBQ Parts for 20,308 Models. Repair your BBQ today.

Contact 1.800.762.1142 for assistance. Do not return to place of purchase.
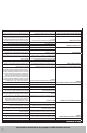
page no.
11
Operating Instructions
Checking for Leaks
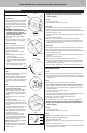
Burner Connections
1. Make sure the regulator valve and hose connections
are securely fastened to the burner and the tank.
If your unit was assembled for you, visually check
the connection between the burner venturi pipe and
orifice. Make sure the burner venturi pipe fits over
the orifice.
WARNING: Failure to inspect this
connection or follow these instructions
could cause a fire or an explosion
which can cause death, serious bodily
injury, or damage to property.
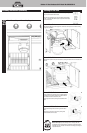
2. Please refer to diagram for proper installation.
(Figure 1 and 2)
3. If the burner pipe does not rest flush to the orifice,
please contact 1.800.762.1142 for assistance.
Tank/Gas Line Connection
1. Make 2-3 oz. of leak solution by mixing one part
liquid dishwashing soap with three parts water.
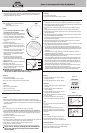
2. Make sure control knobs are “OFF”. (Figure 3)
3. Turn LP gas tank “ON” at valve.
4. Spoon leak check solution at all “X” locations
(Figure 4)
a. If any bubbles appear turn LP gas tank “OFF”,
reconnect and re-test.
b. If you continue to see bubbles after several
attempts, turn LP gas tank “OFF” and disconnect
LP gas tank and contact 1.800.762.1142 for
assistance.
c. If no bubbles appear after one minute turn tank
“OFF”, wipe away solution and proceed.
Operating Main Burners
First Use
1. Make sure all labels, packaging and protective films
have been removed from the grill.
2. Remove manufacturing oils before cooking on this
grill for the first time, by operating the grill for at
least 15 minutes on “HIGH” with the lid closed. This
will “heat clean” the internal parts and dissipate
odors.
Lighting
1. Open lid. Attempting to light the burner with the
lid closed may cause an explosion!
2. Make sure there are no obstructions of airflow to
the burners. Spiders and insects can nest within
and clog the burner / venturi tube at the orifice. A
clogged burner tube can lead to a fire beneath the
appliance.
3. All control knobs must be in the “OFF” position.
(Figure 3)
4. Turn ON gas at LP gas tank.
5. Push and turn control knob slowly about 1/4 turn
counter clockwise until a click is heard. The burner
should light. If the burner does not light, repeat up to
three times.
6. If ignition does not occur, turn control knob to “OFF”,
wait 5 minutes and repeat lighting procedure.
7. To light other burners, repeat the same procedure
for the adjacent burner and continue in sequence
until all desired burners are lit.
8. If igniter does not light burner, use a lit match
secured with the lighting rod provided to light
burners manually. Access the burners through the
cooking grid and heat plates. Position the lit match
near side of the burner. (Figure 5)
Important: Always use the lighting rod provided when
lighting burners with a match.
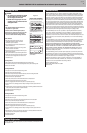
9. After lighting, observe the burner flame, make sure
all burner ports are lit and flame height matches
illustration. (Figure 6)
Caution: If burner flame goes out during operation, immediately turn
the gas “OFF” and open lid to let the gas clear for about 5 minutes
before re-lighting.
Turning Off
1. Turn gas OFF at LP gas tank.
2. Turn all control knobs clockwise to the “OFF” position.
Direct Cooking
Cooking directly over hot burners. Ideal for grilling food requiring less than 25 minutes of
grilling time, such as steaks, hamburgers, hot dogs, chicken parts, vegetables and fruit.
1. Open lid and ignite the desired amount of burners per lighting instructions in owner’s manual.
2. Close lid and preheat grill on “HIGH”.
3. Wear protective gloves and use long handle tongs to place food onto cooking grids above the
lit burners.
4. Adjust controls to desired temperature.
5. With lid open or closed, cook until desired internal food temperatures are achieved.
6. Turn grill OFF by first closing the valve on the propane tank. Burn off remaining gas in lines
by waiting 15 seconds then turn all burner controls to the OFF position. A “poof” sound is
normal as the last of the LP gas is burned.
Indirect Cooking
Not cooking directly over hot burners. Ideal for slow cooking and foods requiring more than 25
minutes such as most roasts, loins, chops, whole chickens, turkey, fish and baked goods.
1. Open lid and ignite the desired amount of burners per lighting instructions in owner’s manual.
2. Close lid and preheat grill on “HIGH”.
3. Wear protective gloves and use long handle tongs to place food onto cooking grids above the
un-lit burners.
4. Adjust controls to desired temperature.
5. With lid closed, cook until desired internal food temperatures are achieved.
6. Turn grill OFF by first closing the valve on the propane tank. Burn off remaining gas in lines
by waiting 15 seconds then turn all burner controls to the “OFF” position. A “poof” sound is
normal as the last of the LP gas is burned.
For more tips on indirect cooking please see “Tips for Better Cookouts and Longer Grill Life”
Operating Sear Burner
First Use
1. Make sure all labels, packaging and protective films have been removed from the grill.
2. Remove manufacturing oils before cooking on this grill for the first time, by operating the grill
for at least 15 minutes on “HIGH” with the lid closed. This will “heat clean” the internal parts
and dissipate odors.
Lighting
NOTE: Infrared sear burner can be used while main burners are operating.
1. Open lid. Attempting to light the burner with the lid closed may cause an explosion!
2. Make sure there are no obstructions of airflow to the gas unit. Spiders and insects can nest
within and clog the burner / venturi tube at the orifice. A clogged burner tube can lead to a
fire beneath the appliance.
3. Control knob must be in the “OFF” position. (Figure 3)
4. Turn ON gas at LP gas tank.
5. Push and turn control knob slowly about 1/4 turn counter clockwise until a click is heard. The
burner should light. If the burner does not light, repeat up to three times.
6. Hold the knob 3 to 5 seconds to allow gas to reach and light the burner.
7. Burner should turn red after 2 to 3 minutes.
8. Turn control knob “OFF” if burner is not lit. Wait 5 minutes and repeat lighting procedure.
Caution: If burner flame goes out during operation, immediately turn
the gas “OFF” and open lid to let the gas clear for about 5 minutes
before re-lighting.
Turning Off
1. Turn gas OFF at LP gas tank.
2. Turn all control knobs clockwise to the “OFF” position.
Cooking
Ideal for searing in juices and flavor in food, such as steaks, roasts, and chicken parts.
1. Open lid and ignite the burner per lighting instructions.
2. Close lid and preheat grill on “HIGH”.
3. Wear protective gloves and use long handle tongs to place food onto cooking grids above the
burner.
4. Adjust control to desired temperature.
5. Keep an eye on the food to make sure the food does not burn, as it will take a very short time
to sear each side of the food. Turn as desired.
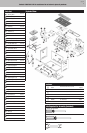
Figure 1
LP Gas
Connection
LP Gas Valve
with Orifice
Burner
venturi
pipe
Main Burners
Figure 2
Burner
venturi pipe
LP Gas
Connection
LP Gas
Valve with
Orifice
Side Burner
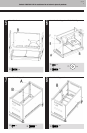
Figure 3
Figure 4
X
X
X
X
X
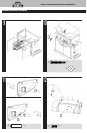
Figure 5
Figure 6
Burner
Flame
Slight
Yellow
Slight
Blue
Dark
Blue