


Special offers from our partners!

Find Replacement BBQ Parts for 20,308 Models. Repair your BBQ today.

LP Gas Outdoor Fireplace Model No. GAD860SP
Contact 1.800.762.1142 for assistance. Do not return to place of purchase.
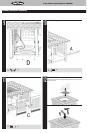
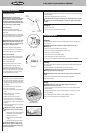
9. After lighting, observe the burner flame, make sure all burner ports are lit and flame height
matches illustration.
10. Adjust flame to desired flame with the control knob.
CAUTION: If burner flame goes out during operation, immediately turn the gas “OFF”
and let the gas clear and fan with newspaper or magazine for about 5 minutes before
re-lighting.
Turning Off
1. Turn gas off at LP tank.
2. Turn all control knobs clockwise to the OFF position.
Cleaning and Care
Inspecting
This outdoor fireplace should be inspected on a regular basis to ensure product safety and
longer product life.
WARNING: Do NOT attempt to inspect this outdoor fireplace until the fire is
COMPLETELY out.
1. Check burner and log set to make sure they are secure.
2. Check venturi to make sure it is clear and free of spider nests.
3. Check all gas connections for leaks.
4. Check ignition system to insure proper sparking.
5. Check components for any signs of damage or rust.
6. If damage to any component is detected, do NOT operate until repairs are executed.
Cleaning
This outdoor fireplace should be cleaned on a regular basis to promote safer experiences and
longer product life.
Note: After repeated use, a slight discoloration of the finishes may occur.
WARNING: Do NOT attempt to clean this outdoor fireplace unless the fire is
COMPLETELY out and unit is cool to the touch.
WARNING: Do NOT use oven cleaner or abrasive cleaners as they will damage this
product.
1. Wipe exterior surfaces with a mild dishwashing detergent or baking soda.
2. Rinse clean with water.
Storage
WARNING: Do NOT move or store this outdoor fireplace unless the fire is
COMPLETELY out and is cool to the touch.
1. Turn gas OFF at tank connection. Remove tank and store in a cool dry location outdoors
away from children.
2. Carefully disassemble log set and store components flat in the fire bowl area to protect
them from breakage.
3. Cover outdoor fireplace with a durable vinyl cover designed to fit this unit.
4. Store in a cool and dry location away from children and pets.
Checking for Leaks
WARNING: Before using this outdoor
fireplace, make sure you have read, understand
and are following all information provided in
the Dangers and Warnings presented on page
2. Failure to follow those instructions can cause
death, serious injury or property damage.
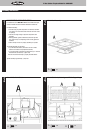
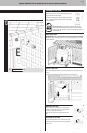
Burner Connections
Make sure the regulator valve and hose
connections are securely fastened to the burner
and the tank.
If your unit was assembled for you, visually check
the connection between the burner pipe and orifice.
Make sure the burner pipe fits over the orifice.
WARNING: Failure to inspect this connection
or follow these instructions could cause a fire
or an explosion which can cause death, serious
bodily injury, or damage to property.
Please refer to diagram for proper installation.
If the burner pipe does not rest flush to the orifice,
please contact 1.800.762.1142 for assistance.
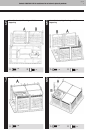
Tank/Gas Line Connection
Make 2-3 oz. of leak solution by mixing one part
liquid dishwashing soap with three parts water.
Make sure control knob is OFF.
Turn LP gas tank ON at valve.
Spoon leak check solution at all “x” locations
If any bubbles appear turn LP gas tank OFF,
reconnect and re-test. If you continue to see
bubbles after several attempts, disconnect LP gas
source and contact 1.800.762.1142 for assistance.
If no bubbles appear after one minute turn tank
OFF, wipe away solution and proceed.
Lighting
1. Make sure there are no obstructions of airflow to
the gas unit. Spiders and insects can nest within
and clog the burner / venturi tube at the orifice.
A clogged burner tube can lead to a fire beneath
the appliance.
2. Control knob must be in the “OFF” position.
3. Turn on gas at LP gas tank.
4. Push and turn control knob counterclockwise to
“LOW”.
5. Press the electronic igniter and hold for
5 seconds to light burner.
6. Release control knob after 45 seconds.
7. If ignition does not occur in 45 seconds, turn
burner control knob “OFF”, wait 5 minutes, fan
with newspaper or magazine, and repeat lighting
procedure.
8. If igniter does not light burner, use a long match
or long butane lighter.
CAUTION: Before Lighting - Using a shovel
to carefully move the lava rocks to access the
burner.
a. Wearing Heat reistant gloves, position the
lit long match or lit long butane lighter
near the side of the burner.
b. Turn control knob counterclockwise to
“LOW”.
c. Remove long match/long butane lighter.
CAUTION: After Lighting - Using a shovel
and heat resistant gloves, carefully move the
lava rocks back to their proper position, being
careful to avoid the flame.
LP Gas
Connection
LP Gas Valve
with Orifice
Burners
X
X
X
X
X
LP Gas Tank Valve
Control Knob
Operating Instructions
Proper flame height.
Lighting Rod Placement
K
F