


Special offers from our partners!

Find Replacement BBQ Parts for 20,308 Models. Repair your BBQ today.

13
Owner’s manual: model FG2204C outdoor gas grill / Manual de usuario: parrilla de gas para exteriores, modelo FG2204C 8/5/04
Contact 1-800-762-1142 for assistance.
Do not return to place of purchase.
Si necesita ayuda llame al 1-800-762-1142
No devuelva el artículo al lugar de compra.
14
Owner’s manual: model FG2204C outdoor gas grill / Manual de usuario: parrilla de gas para exteriores, modelo FG2204C 8/5/04
Contact 1-800-762-1142 for assistance.
Do not return to place of purchase.
Si necesita ayuda llame al 1-800-762-1142
No devuelva el artículo al lugar de compra.
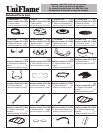
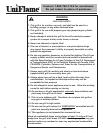
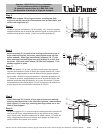
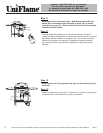
Step 1
Feed wheel axle (24) through holes in wheel legs (14), as shown.
Pop plastic decals off wheels (22), then attach wheels to axle using
rubber washers (F), large washers (H) and large nuts (I), as shown.
Reattach plastic decals.
Attach two clips (21) to each of two wheel legs (14) and two bottom
legs (15), as shown at arrow markings, assuring that arrow on
clips point upward. Slide bottom shelf (12) onto legs, assuring
that sleeves at the corners of the flat side of the shelf slide onto
bottom legs, and sleeves at the corners of the indented side (for
LP tank) of shelf slide onto wheel legs. Screw four top legs (13) to
assembled legs and shelf, as shown.
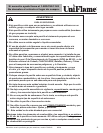
Paso 1
Pase el eje de las ruedas (24) a través de los oricios de las patas de
las ruedas (14), tal y como se muestra. Quite momentáneamente las
calcomanías de las ruedas (22), a continuación acople las ruedas al
eje, utilizando arandelas de goma (F), arandelas grandes (H) y tuercas
grandes (I), tal y como se muestra. Vuelva a colocar las calcomanías de
plástico.
Coloque dos grapas (21) en cada una de las dos patas con ruedas (14)
y en las dos patas inferiores (15), tal y como indican las marcas de las
echas, asegurándose de que la echa de las grapas apunta hacia
arriba. Deslice el estante inferior (12) sobre las patas, asegurándose
de que las fundas de las esquinas del lado plano del estante se desliza
sobre las patas inferiores y que las fundas de las esquinas del lado
indentado (para depósito LP) del estante se desliza sobre las patas con
ruedas.
Atornille las cuatro patas superiores (13) a las patas y al estante
montados, tal y como se muestra.
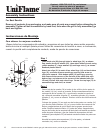
Assembly Instructions
For Best Results
Remove all contents from packaging, and make sure all parts are present before attempting to
assemble! Tighten all bolt connections by hand first, then when the grill is fully assembled, go
back and tighten.
TOP
Instrucciones de Montaje
Para obtener los mejores resultados
¡Saque todos los componentes del embalaje y asegúrese de que todas las piezas están presentes
antes de iniciar el montaje! Apriete primero todas las conexiones de tornillos a mano, a continuación,
cuando la parrilla esté completamente montada, acabe de apretar las conexiones.