


Special offers from our partners!

Find Replacement BBQ Parts for 20,308 Models. Repair your BBQ today.

7
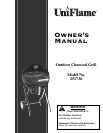
Owner’s manual: model 251736 outdoor charcoal grill / Manual de usuario: parrilla de carbón vegetal para exteriores, modelo 251736 1/9/03
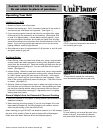
Contact 1-800-762-1142 for assistance.
Do not return to place of purchase.
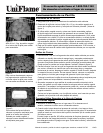
Si necesita ayuda llame al 1-800-762-1142
No devuelva el artículo al lugar de compra.
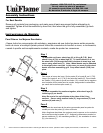
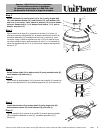
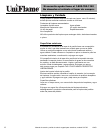
Step 1
To assemble cart frame, attach legs (6) to U-Leg B (7-B). Next,
attach U-Leg A (7-A) to wheel legs (5). To install wheels 12-A, run
the wheel axle (10) through the holes in bottom of wheel legs, and
secure using wheel nuts (J). Note: Wheel decals may be attached
to the wheels when received. In this case, you must pop the wheel
decals off before assembling grill. Snap wheel decals (12-B) into
place.
Paso 1
Para armar el marco del carro, fije las patas (6) a la pata B, en U (7-B).
Luego, fije la pata A, en U (7-A) a las patas de ruedas (5). Para instalar
las ruedas (12-A) pase el eje de las ruedas (10) a través de los agujeros
en el extremo de las patas para las ruedas, asegurando los elementos
por medio de las tuercas para rueda (J).
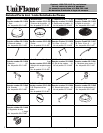
Assembly Instructions
For Best Results
Remove all contents from packaging, and make sure all parts are present before attempting to
assemble! Tighten all bolt connections by hand first, then when the grill is fully assembled, go back
and tighten.
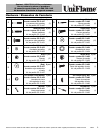
7-A
7-B
6
5
10
12-A
12-B
J
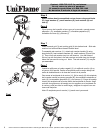
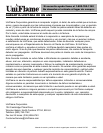
Step 2
To attach assembled leg sections together, slide wheel legs (5)
inside legs (6), as shown.
Note: Be sure to line up boltholes at the sides of the U-Leg
sections. Secure using medium bolts (C), large washers (F), lock
washers (H) and nuts (I).
Paso 2
Para juntar las secciones de las patas ya armadas pase las patas de
ruedas por entre las patas (6), como se ilustra.
Nota: Asegúrese de alinear los agujeros para los pernos en los costados
de las secciones de las patas en U. Asegure los elementos usando los
pernos medianos (C), las arandelas grandes (F), las arandelas de cierre
(H) y las tuercas (I).
C
I
H
F
Instrucciones de Montaje
Para Obtener los Mejores Resultados
¡Saque todos los componentes del embalaje y asegúrese de que todas las piezas están presentes
antes de iniciar el montaje! Apriete primero todas las conexiones de tornillos a mano, a continuación,
cuando la parrilla esté completamente montada, acabe de apretar las conexiones.